GitHub Issue Templates and Plaster
GitHub recently announced new features and support for multiple issue templates. Before, GitHub supported a single template, by supporting multiple types of issues, we can gather the right information from the beginning.
GitHub recently announced new features and support for multiple issue templates. Before, GitHub supported a single template, by supporting multiple types of issues, we can gather the right information from the beginning.
When we create multiple issue templates, users will be prompted to specify the type of issue they want to create. We can target specific questions or information requests for specific types of issues.
GitHub provides two pre-created templates, bug report and feature request. These pre-created templates suit most situations. Bug report issues can focus on reproduction, expected behavior and other troubleshooting information. Feature request templates can focus on understanding the what, how and why a new feature is required. You can also create your own templates for other situations, you don’t have to use what GitHub provides.
I've updated my Plaster template for PowerShell modules to contain a bug report and feature request template. I modified GitHub’s template to ask for things like: • PowerShell transcripts. • Operating System and PowerShell versions. • A list of any other modules that might imported.
You can create templates via the GitHub interface, or simply include them in the ISSUE_TEMPLATE folder in your repository. You can also create the templates yourself. You need to include the name and a description for each template. Much like this:
---
name: Bug report
about: Create a report to help us improve

---
So, what do the new templates look like for a user? If you select Issues > New Issue, you can now select what kind of issue you'd like to raise. In the case in the image, we can choose bug report or feature request. Users can opt for “Open a regular issue”, in this case GitHub will use ISSUE_TEMPLATE.MD.
You can also define multiple pull request templates in the same manner. Simply put each template into the PULL_REQUEST_TEMPLATE folder. The experience is like creating an Issue. I'm creating different pull request templates for Planet PowerShell, so we can correctly track changes.
If you want to start using these templates as part of your Plaster templates, you can see my examples over at my Plaster template.
Presentation: Secure Azure Deployment Patterns
It was a wonderful experience to present at the Azure Global Bootcamp in Melbourne this year. This year I spoke about possible methods or patterns for securing Azure resources. This is an extremely board topic, though I focused on App Services, Virtual Network Endpoints and ARM templates.
It was a wonderful experience to present at the Azure Global Bootcamp in Melbourne this year. This year I spoke about possible methods or patterns for securing Azure resources. This is an extremely board topic, though I focused on App Services, Virtual Network Endpoints and ARM templates.
You can find the PowerPoint slides to download here or view them via SlideShare.
Posh-SYSLOG 3.3 has been released
Several days ago, Jared raised a Pull Request for Posh-SYSLOG to correct an issue with the module’s manifest. It seems that in version 3.0 of Posh-SYSLOG, I used the PowerShellHostVersion attribute of the module manifest and not PowerShellVersion to specify the minimum Powershell version. This wouldn't have created issues within a normal PowerShell session, but would have prevented the module from loading in VS Code (as Jared reported) or the ISE.
Several days ago, Jared (powershellshock) raised a Pull Request for Posh-SYSLOG to correct an issue with the module’s manifest. It seems that in version 3.0 of Posh-SYSLOG, I used the PowerShellHostVersion attribute of the module manifest and not PowerShellVersion to specify the minimum Powershell version. This wouldn't have created issues within a normal PowerShell session, but would have prevented the module from loading in VS Code (as Jared reported) or the ISE.
To understand the difference of these attributes, I suggest reading: PowerShellHostVersion – WTF?, by Jeffrey Snover.
This is by far my most popular module and it's become even more popular this year. Since January there's been almost 20 000 downloads of the module, compared to 1600 for the previous 2 years combined! I'm amazed that this simple little module has gained such popularity!
Getting the Module
If you have never used the module before, the easiest way to get Posh-SYSLOG is through the PowerShell Gallery:
PS> Install-Module -Name Posh-SYSLOGIf you already have the module installed, you can update the module from the PowerShell Gallery with:
PS> Update-Module -Name Posh-SYSLOGYou can also find the module on GitHub.
Found an issue? Then raise any bugs or feature requests via GitHub Issues.
AzurePublicIPAddresses v1.0 has been released
I'm pleased to announce Version 1.0 of AzurePublicIPAddresses. This version includes support 6 new Azure regions:
Australia Central
Australia Central 2
UK North
UK South 2
North Europe 2 (name TBC)
East Europe (name TBC)
This release also represents a major milestone since the modules creation back in March 2016. The module has proven to be very stable, and hence I'm now giving it the stable 1.0 moniker. I'm confident that the existing design should support any new regions or source XML files that Microsoft may release without the need for breaking changes.
I'm pleased to announce Version 1.0 of AzurePublicIPAddresses. This version includes support 6 new Azure regions:
- Australia Central
- Australia Central 2
- UK North
- UK South 2
- North Europe 2 (name TBC)
- East Europe (name TBC)
This release also represents a major milestone since the modules creation back in March 2016. The module has proven to be very stable, and hence I'm now giving it the stable 1.0 moniker. I'm confident that the existing design should support any new regions or source XML files that Microsoft may release without the need for breaking changes.
What's the future for this module? With the launch of Azure Service Tags, in some respects this module has become less useful, but, I'll maintain the module for the immediate future.
I'm also thinking how this module and the JSON based file for Azure Service Tags should fit together. My current through it to create a separate module that consumes that file and allows you to select addresses by region and service.
Getting the Module
If you have never used the module before, the easiest way to get AzurePublicIPAddresses is through the PowerShell Gallery:
PS> Install-Module -Name AzurePublicIPAddressesIf you already have the module installed, you can update the module from the PowerShell Gallery with:
PS> Update-Module -Name AzurePublicIPAddressesYou can also find the module on GitHub.
Found an issue? Then raise any bugs or feature requests via GitHub Issues.
PowerShell Syntax Highlighting with SquareSpace
SquareSpace has been my blogging platform of choice since 2011. My biggest complaint with the platform has always been syntax highlighting. SquareSpace comes with some simple highlighting, but it only supports a few languages, certainly not PowerShell. Over the years I've tried everything from simply using bold and italic text, to using custom HTML and even embedded Pastebin and GitHub Gists. No matter what I tried, I was never happy with the result.
SquareSpace has been my blogging platform of choice since 2011. My biggest complaint with the platform has always been syntax highlighting. SquareSpace comes with some simple highlighting, but it only supports a few languages, certainly not PowerShell. Over the years I've tried everything from simply using bold and italic text, to using custom HTML and even embedded Pastebin and GitHub Gists. No matter what I tried, I was never happy with the result.
I'd looked and failed to find something that worked. While I was preparing for my post Managing Windows Speculation Control Protections with PowerShell DSC, I decided to take one more look. Stephen Gurnett had written a post about highlighting support for Swift with SquareSpace using Highlight.js. I took a quick look and realised this would work for PowerShell.
Highlight.js provides syntax highlighting for 176 languages with 79 different styles. It features automatic language detection, supports multiple languages per page and works with any markup or js framework. The best part is it's dead simple, even on a SaaS blog like SquareSpace. You don’t need to host the code anywhere as it's available via CloudFlare's CDN.
Getting Started with Highlight.js
The first step is including the code on our site. From the SquareSpace configuration/management screen, navigate to Settings > Advanced (Under Website) > Code Injection. You'll see 4 sections, Header, Footer, Lock Page and Order Confirmation Page. In the header section, add this HTML:
<link rel="stylesheet" href="//cdnjs.cloudflare.com/ajax/libs/highlight.js/9.12.0/styles/vs2015.min.css">
<script src="//cdnjs.cloudflare.com/ajax/libs/highlight.js/9.12.0/highlight.min.js"></script>
<script src="//cdnjs.cloudflare.com/ajax/libs/highlight.js/9.12.0/languages/powershell.min.js"></script>
<script>hljs.initHighlightingOnLoad();</script>
What does this all mean?
The first line tells a visitor’s browser to load another CSS stylesheet. In this example, the Visual Studio 2015 theme. Don’t worry, your existing styles can safely live together with the Highlight.js stylesheet.
The next line loads the Highlight.js JavaScript. This is the code that will make syntax highlighting work on your blog. We're loading it from CloudFlare’s JavaScript CDN.
The third line is important. By default, the Highlight.js that's available from CDN only supports a set of common languages: CSS, JavaScript, C#, Bash, INI, SQL, Markdown, JSON, HTML, etc. Sadly, PowerShell isn’t one of the common languages. To support PowerShell, we need this line to load the support for it.
The last line causes the magic to happen. This line triggers the Highlight.js to go and highlight any code blocks that it finds.
Using Highlight.js
For Highlight.js to work on SquareSpace, you'll need to use the markdown content block and then use the code block syntax. Your Markdown block would look something like:
```
Write-Host 'This is some PowerShell!'
```
That block would result in the this:
Write-Host 'This is some PowerShell!'Highlight.js will attempt to detect what language is used within the content block, though you can specify the language. I opt to specify the language. You can specify blocks like this:
```json
[
  {
    "title": "apples",
    "count": [12000, 20000],
    "description": {"text": "...", "sensitive": false}
  },
  {
    "title": "oranges",
    "count": [17500, null],
    "description": {"text": "...", "sensitive": false}
  }
]
```
Which results in:
[
  {
    "title": "apples",
    "count": [12000, 20000],
    "description": {"text": "...", "sensitive": false}
  },
  {
    "title": "oranges",
    "count": [17500, null],
    "description": {"text": "...", "sensitive": false}
  }
]
If you don’t want to use markdown for all your content, you can always mix text and markdown blocks.
Issues
So Highlight.js isn’t perfect, especially its PowerShell support. Highlight.js doesn’t properly highlight all PowerShell syntax, for instance, it will only highlight CMDLets that it knows about. Support for things like DSC or Pester isn’t present. While annoying, these aren't show stopping issues.
Conclusion
I hope this helps you work with PowerShell in SquareSpace. Happy Blogging!
AzurePublicIPAddresses module now supports the France and Germany Azure Regions
I'm pleased to announce that my PowerShell for working with Azure’s public IP address listings now supports the new Azure Regions in France and Germany. This release, 0.9, introduces some minor breaking changes, needed to support the Germany regions.

Map of Azure Regions as of February 2018
I'm pleased to announce that my PowerShell for working with Azure’s public IP address listings now supports the new Azure Regions in France and Germany. This release, 0.9, introduces some minor breaking changes, needed to support the Germany regions.
Each month of so, I check the Microsoft Azure Datacenter IP Ranges file for new regions. This month, I noticed that the France Central and France South are included.
The Azure Germany regions, Germany Northeast and Germany Central, are managed under a trustee model by T-Systems. This is like that of Azure in China. I hadn’t seen the German regions IP ranges before, but last week I found the file: Windows Azure Datacenter IP Ranges in Germany. My goal always was to support every available Azure Region, as such, I've now included these regions.
I must admit, I didn’t fully design this module to be future proof, I assumed all regions would be included in a single file. I first included Azure in China in version 0.8, with the -ChinaRegion parameter. While functional, this wasn’t future proof. To offer support for Azure Germany, version 0.8 includes some breaking changes in the Get-MicrosoftAzureDatacenterIPRangeFile CMDLet.
With version 0.9, I've removed the -ChinaRegion parameter and replaced it with -Region. This new parameter takes one of 3 values: Standard, China or Germany. This parameter now has this behaviour:
- Standard: the default value, downloads the Microsoft Azure Datacenter IP Ranges file.
- China: downloads the Windows Azure Datacenter IP Ranges in China file
- Germany: downloads the Windows Azure Datacenter IP Ranges in Germany file
If you were separately downloading the China region file, you'll need to ensure that you update your scripts logic.
I've also tweaked Get-MicrosoftazureDatacenterIPRange. The first change was to add support for the extra file to download, and the parameter change. I've also modified the logic around how the CMDLet stores the region information. I don’t expect these changes to cause any issues.
Getting the Module
If you have never used the module before, the easiest way to get AzurePublicIPAddresses is through the PowerShell Gallery:
PS> Install-Module -Name AzurePublicIPAddressesIf you already have the module installed, you can update the module from the PowerShell Gallery with:
PS> Update-Module -Name AzurePublicIPAddressesYou can also find the module on GitHub.
Found an issue? Then raise any bugs or feature requests via GitHub Issues.
Managing Windows Speculation Control Protections with PowerShell DSC
As part of their response to the Speculative Execution vulnerabilities, Spectre and Meltdown, Microsoft released updates for all supported systems. Microsoft made the decision to not enable these protections in Windows Server by default. It's up to you as the administrator to enable the protections.
As part of their response to the Speculative Execution vulnerabilities, Spectre and Meltdown, Microsoft released updates for all supported systems. Microsoft made the decision to not enable these protections in Windows Server by default. It's up to you as the administrator to enable the protections.
Microsoft’s used the reg command to make the registry changes. This tool is great on a single machine, but it doesn’t scale. You need to use a configuration management tool like PowerShell DSC to make the changes at scale.
These changes could be made using the registry DSC resource, but I wanted a more simplified configuration using a custom DSC resource. I looked, and couldn’t find a resource, so I created cSpeculationControlFixes.
Managing the Protections
With the cSpeculationControlFix resource, administrators can enable or disable the protections. You'll need to restart the system for the changes to take effect, cSpeculationControlFix will notify the LCM if a reboot is required.
Configuration EnableSpeculationControl
{
    Import-DscResource -Module cSpeculationControlFixes
    cSpeculationControlFix enableSpeculationControlFix
    {
        Status = 'Enabled'
    }
}
Spectre Variant 2
Microsoft now provides a mechanism for enabling and disabling the Spectre Variant 2 protections separately from the other protections. With the cSpectreVariant2 resource, an administrator can enable or disable just the Spectre Variant 2 protections. For this resource to work, you need to have the updates described in this knowledge base article. Once again, cSpectreVariant2 will notify the LCM if a reboot is required.
Configuration EnableSpectreVariant2
{
    Import-DscResource -Module cSpeculationControlFixes
    cSpectreVariant2 enableSpectreVariant2Fix
    {
        Status = 'Enabled'
    }
}

Configuration DisableSpectreVariant2
{
    Import-DscResource -Module cSpeculationControlFixes
    cSpectreVariant2 enableSpectreVariant2Fix
    {
        Status = 'Disabled'
    }
}
Anti-Virus Compatibility Flag
A massive issue with these updates is that Windows Update won't offer to install these updates unless your anti-virus product as created the appropriate compatibility flag. This issue is, what about those computers, mainly servers, that don’t have an anti-virus product installed? The truth is, these update, nor any further security updates will be available.
To combat this, the cSpeculationControlAVCompatibility resource allows and administrator to enable this flag on systems that don’t have an anti-virus installed.
Configuration EnablecSpeculationControlAVCompatibility
{
    Import-DscResource -Module cSpeculationControlFixes

    cSpeculationControlAVCompatibility enablecSpeculationControlAVCompatibility
    {
        Status = 'Enabled'
    }
}
Getting the Module
The easiest way to get cSpeculationControlFixes is using the PowerShell Gallery, or from GitHub.
Installing the module from the gallery is as easy as:
PS> Install-Module -Name cSpeculationControlFixesIf you discover any issues, please report then via GitHub Issues.
Kieran Jacobsen
Using Intune and AAD to protect against Spectre and Meltdown
I’m a big fan of Intune’s device compliance policies and Azure Active Directory’s (AAD) conditional access rules. They're one piece of the puzzle in moving to a [Beyond Corp][5] model, that I believe is the future of enterprise networks.
I’m a big fan of Intune’s device compliance policies and Azure Active Directory’s (AAD) conditional access rules. They're one piece of the puzzle in moving to a Beyond Corp model, that I believe is the future of enterprise networks.
Compliance policies allow us to define what it takes for a device (typically a client) to be considered secure. The rules could include the use of a password, encryption, OS version or even if a device has been jail-broken or rooted. In Intune we can define policies for Windows 8.1 and 10, Windows Phone, macOS, iOS and Android.
One critical thing to highlight is that compliance policies don’t enforce settings and don’t make changes to a device. They're simply a decision-making tool that allows Intune (and AAD) to determine the status of the device. If we want to make changes to a device, we need to use Intune configuration policies. It's up to the admin or the user to make a non-compliant device compliant.
A common misconception with compliance policies are that the verification process occurs in real-time, that is, when a user tries to login the device's compliance status is checked. The check occurs on an hourly basis, though users and admins can trigger off a check manually.
The next piece of the puzzle are conditional access policies. These are policies that allow us to target different sign-in experiences for different applications, devices and user accounts. A user on a compliant device may receive a different sign-in experience to someone using a web browser on some random unknown device.
How compliance policies and conditional access work together
To understand how Compliance Policies and Conditional Access works, let’s look at a user story.
Fred works in the Accounting department at Capital Systems. Fred has a work PC issued by Capital’s IT Team, and a home PC that he bought from a local computer store.
The IT team has defined two Conditional Access policies:
- For Office 365: a user can connect from a compliant device, or needs to pass an MFA check.
- For the finance system: the user can only connect from a compliant device and must pass an MFA check.
How does this work in practice?
When Fred tries to access his email from his work device, perhaps through a browser, AAD will check his device’s compliance status during login. As Fred’s work PC is compliant, it will allow access to his email.
Fred now goes home, on the train he remembers he forgot to reply to an important email. When Fred gets home, he starts his home PC and navigates to the Office 365 portal. This time, AAD doesn’t know the device, so it will treat the device as non-compliant. This time, Fred will be prompted to complete MFA before he can access his email.
Things are different for Fred when he tries to access Capital’s finance system. Fred will be able to access this system from his work PC as its complaint, assuming he completes an MFA request. Fred won't be able to access this finance system from his home PC as his device isn’t compliant.
These rules allow Capital System’s IT team to govern who can access an application, from what devices they can access it from, and if they need to complete MFA.
Ensuring Spectre and Meltdown Patches are installed
We can use compliance policies to check if a device’s OS version contains the Spectre and Meltdown patches. When Intune checks the devices compliance, if isn't running with expected patch level, it will be marked as non-compliant.
What does this mean for the user? In Fred’s case, if his work PC lacks those updates, he may receive extra MFA prompts and loose access to the finance system, until he installs the right patches.
The Intune portal and PowerBI can be used to generate reports on device compliance and identify devices that need attention. You can also configure Intune to email a user when their device becomes non-compliant. This email can be customised, I recommend that you include a link to a remediation guide or to your support system.
Configuring Intune Compliance Policies
Compliance policies can be created and modified in the Azure Portal via the Intune panel. Simply navigate to the Device Compliance and then Policies. You'll need to create a separate policy for each OS that you want to manage compliance.
Within a compliance policy, we specify an OS version using a “major.minor.build” formatted string.
The major versions numbers are:
- Windows 10 - 10.0 Note that the .0 is important*
- Windows 8.1 - 3
- macOS - 10
We can express things like Windows 10 Fall Creators, or macOS High Sierra using the minor version number.
- Windows 10 Fall Creators Update - 10.0.16299
- macOS High Sierra - 10.13
Finally, we can narrow down to a specific release or patch by using the build version number. For instance, the January updates for each platform are:
- Windows 10 Fall Creators Update - 10.0.16299.192
- macOS High Sierra - 10.13.2
You can specify the minimum and maximum OS version by navigating to Properties, Settings and then Device Properties.

Setting the minimum Windows 10 version in a compliance policy.
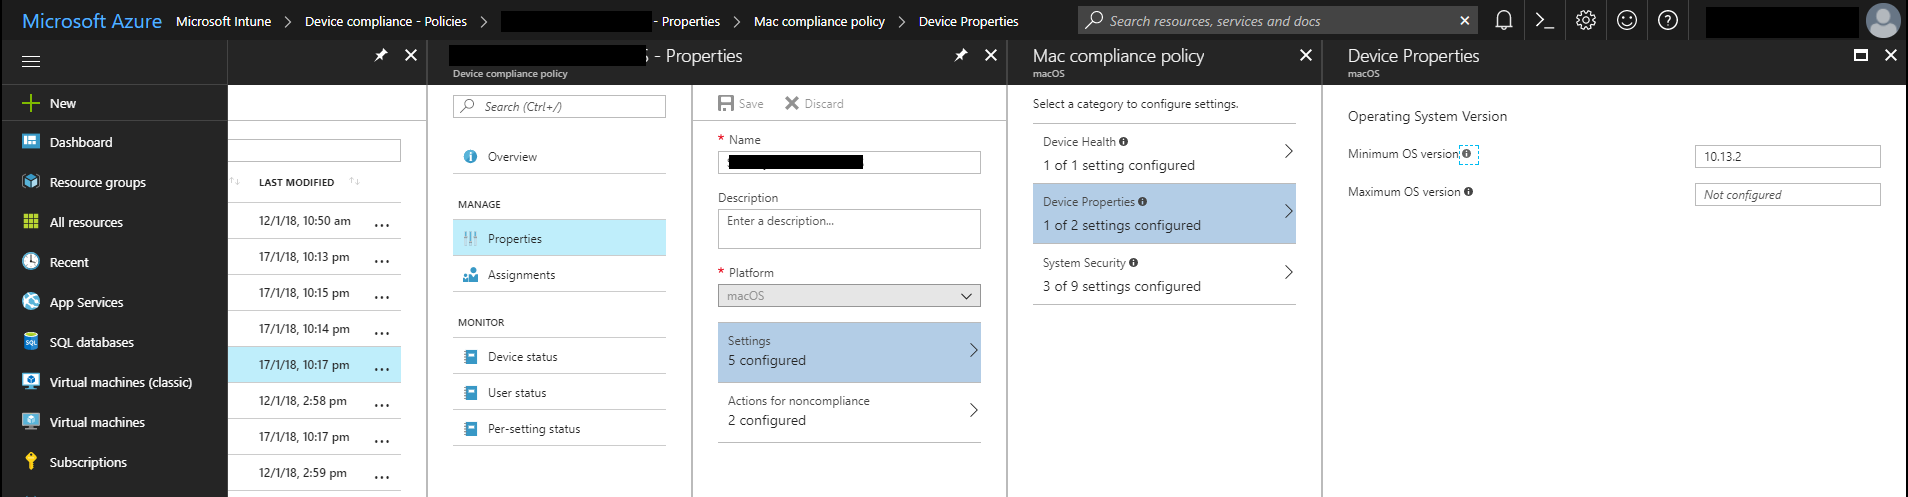
Setting the minimum macOS version in a compliance policy.
Once you have made this change, devices that don't meet the minimum version will be marked as non-compliant during their next compliance evaluation.
Kieran Jacobsen