
Why is managing DNS hard?
DNS is one of those critical systems that never gets the attention it deserves. Every organisation relies on DNS. It is critical for the smooth operation of your business and yet, it's rarely considered as important as web and email. Your customers can’t find your corporate website or email servers without DNS, without DNS your business isn’t online. People shouldn’t be required to remember an IP address (something that's next to impossible with IPv6) just to access the corporate intranet!
Want to know what I do when I join a new company? I check out their DNS zones. I do a similar review for acquisitions. You can tell a lot from an organisations DNS. You can determine their email providers, SaaS providers and even learn how their infrastructure is built; just from looking at their DNS zones. InfoSec consults have long touted the power of basic DNS recognisance against target organisations.
DNS is also a powerful measure of an organisations maturity. Can your IT team explain each entry in their organisations public DNS zones? What does the entry mean? What does it point to? What does it do? Who requested it? From experience, most organisations can’t explain every entry, most can’t explain half the entries.
Make a DNS change and everybody looses their minds.
Those of you who have a change management process, ITIL or Prince, are probably feeling a little smug right now. You have change request forms, "the forms will tell us everything we need to know" you say. I've 2 questions for you: Do you effectively capture this information? And, how long would it take you to find the change request for any entry I randomly pointed to? 5 minutes? 30 minutes? A Day? If your organisation is under attack, or you’re amid a disaster recovery situation, can you answer these questions?
Another challenge with more traditional change processes is the delay from request to a DNS change occurring. How long will it take for Alice a developer in the products team to get DNS pointing to a new application instance? What if we could reduce this time from days down to minutes? How much does that save our organisation?

I'm not saying it's a DNS problem...But it's a DNS problem.
In the past, DNS changes happened infrequently. With the move to faster release cycles and DevOps, changes to DNS happen more often, sometimes daily. Can your processes and tools meet these demands? Does it make sense to have someone from the server team, network team or security team involved every time a developer needs to make a change?
Let’s talk more about tooling.
Internally, most organisations are running Windows DNS (often called Active Directory DNS) or BIND. While you might use PowerShell to manage your Windows DNS servers, you're probably using the GUI. I like BIND, but BIND files can be daunting especially if you're not familiar with their structure.
Many organisations have turned to DNSaaS (DNS as a Service) for their external DNS zones. This move has increased availability and uptime, but at a cost: how we manage these domains. Managing DNS from a provider like CloudFlare, DNSimple, GoDaddy or even AWS typically occurs through a web portal. Sure, these providers provide APIs and other management methods, but in the end, when left alone, people will naturally drift to a GUI.

New Troubleshooting Procedure: 1) It's not DNS. 2) There' s now way it's DNS. 3) It was DNS.
My issue isn’t with using a GUI, my issue stems from the lack of standardization across the different providers and their interfaces. Each vendor has its own way of doing things, and that's often where mistakes creep in. With some providers, changes occur immediately, others you need to hit save first. These differences in operators makes room for confusion.
The other challenge with a lot of DNSaaS providers is securing access. Most providers only provide a single account for administration and access, if they do support multiple accounts, they charge big bucks for those abilities. How do I securely allow a large team of IT operations staff access? Can I provide read-only access to developers? Limited read/write access?
Visibility is another challenge. If I had a dollar for every argument I had about a DNS change, I could retire! Wouldn’t it be great if there was some mechanism for everyone to feel comfortable about a change?
How should we manage DNS?
What does the perfect DNS management process look like? How can we use simple tools and techniques, that most teams are familiar with, to manage DNS better?
I think there are a few simple guidelines:
- We should be able to write our DNS zones in an easy to understand format.
- We should be able to use comments to describe the entries within a zone.
- Version control should be used to track changes to the zone and who made a change.
- We should have an open and clear review process for changes.
- We perform changes automatically, without human interaction.
The format needs to be simple and human readable, it should be understandable by all. Anyone will be able to review a change and understand how it changes them, and anyone should be able to propose a change.
Within the human readable format, we should be able to use comments to describe the contents of the zone. Comments allow us to answer the age-old question: “what’s this record for?”. We can also use comments to explain decisions within the zone.
It's important that we maintain a history of changes made, and this is where a version control system like Git comes in. Git allows us to easily see the who, what and how when production goes down. Version control also provides us with a mechanism to roll back changes.
Pull requests allow you to tell others what changes you're about to make. You can then discuss and review the potential changes. You can automatically include teams that might need to be involved like your network and security teams. Once everyone has completed their reviews, changes can be pushed to production. Pull requests shine a light on changes in a way that ITIL was promised to organisations, but doesn't deliver.
The final step is automation. We use build and release pipelines to validate changes before pushing them to production. Human interaction shouldn’t be required once a proposed change is approved. The use of automation to make changes reduces the chance of mistakes. Every change made to your DNS zone is exactly as described in the zone’s configuration file. We already know the value of automated application deployments, so why not extend it to DNS!
In this article, I'm focusing on public DNS, though the tools and methods will work just as well for the internal DNS within your corporate network.
Why Make Planet PowerShell’s DNS Public?

Planet PowerShell
It seems strange to make a sites DNS zone public as I have with Planet PowerShell, I put it all in a public Git repo. I thought long and hard about it, these entries are public after all, and you could easily discover all the information contained with 5 to 10 DNS queries. I just didn’t see any reason to keep the information private.
One of my goals with Planet PowerShell is to run and maintain it as a learning and teaching platform. I’ve learnt so much maintaining it, there's more to learn in the future too. I want the community to have the same opportunity to learn as I have. If this journey and this post helps just one other person, then it’s totally worth it.
There are some things that I can’t make public. Obviously, I can’t make the API credentials public, but I also want to protect the underlying Azure App Service infrastructure. I deliberately run Planet PowerShell behind CloudFlare, so the IP addresses of the Azure App Services needs to remain private. As with API credentials, I use tokens within the DNSControl files to protect these entries.
You can find everything in the Planet PowerShell Infrastructure repository on GitHub.
Components
So how should you manage your DNS? In this post we will put together a bunch of tools:
- DNSControl: Defines the format of our zone configuration, checks it's valid, validates potential changes and then pushes the changes.
- CloudFlare: My DNS provider of choice.
- DNSimple: Who I buy domains from.
- Git: Version control system of choice. We will store the zone configuration in a Git repository.
- GitHub and VSTS: GitHub hosts the repository and VSTS the build and release pipelines.
- Azure Key vault: Stores our sensitive credentials.
- Docker: well why not?
Let’s investigate each with a little more detail.
DNSControl
The Stack Overflow team originally developed DNSControl to manage all their domains. After the DYN DDOS attack of 2016, many organisations were looking for better ways to manage their DNS and mitigate the next DNS attack, DNSControl is the result of Stack Overflows efforts.
DNSControl supports managing domain registrars, those who we buy domains from, and DNS providers, those who provide our DNS services, providing end-to-end management.
Support for registrars includes:
You can use DNSControl with a registrar that isn’t supported, for instance, GoDaddy. The none provider will allow you to manage a zone that you have purchased from a registrar who isn’t supported. Word of warning, some of DNSControl’s features may not work.
Support for DNS providers includes:
- Active Directory/Windows DNS
- BIND
- CloudFlare
- DigitalOcean
- DNSimple
- Gandi
- Google Cloud DNS
- Linode
- NameCheap
- Name.com
- NS1
- OctoDNS (no documentation at this time)
- Ovh
- Route53
- SoftLayer
- Vultr
There's a few more providers (DYN, DNS Made Easy, Hexonet) waiting for their pull requests to completed. There is planned support for: Azure DNS, ClouDNS, Dns.he.net, GoDaddy, NameSilo, and Internetworx. You can always contribute if your favourite provider is missing.
At Readify, we have been using DNSControl to manage our own domains for a bit over a year. Anyone in Readify can propose a DNS change, and our Platforms team can then review and approve those requests. This empowers our developers and consultants to build new applications and systems without requiring complex changes from an infrastructure perspective.
You write the structure of your domain(s) using JavaScript, and then let DNSControl will handle the rest. Don’t worry, you don’t need any experience with JavaScript to be able to use DNSControl. If I can do it, anyone can! Later in this article I'll dive into the structure of a DNSControl configuration file.
One of the most powerful features of DNSControl is the ability for you to see what changes it will make before they occur. DNSControl makes use of a three-step process, first you check that a file has the correct syntax. Next you preview the changes including any additions, removals or modifications. Finally, you can push the changes to your provider.
Now I can hear you saying, “but surely migrating to DNSControl is really hard and risky?”. Here is the trick, the power of DNSControl makes migrating easy! If your DNS provider allows you to export your zone as a BIND file, there's a handy utility (convertzone) to convert BIND files to DNSControl files. With DNSControl’s ability to preview changes before pushing them, you'll be confident that everything will work as expected.
DNSControl also allows you to maintain a DNS zone across multiple providers. This gives you availability across different providers as well as to simple way to migrate between DNS providers. I recently used DNSControl to migrate a domain from Amazon’s Route 53 to Cloudflare. Zero down time, and zero stress.
If you don’t like DNSControl, I recommend looking at OctoDNS from the GitHub team. OctoDNS uses YAML to define the structure of the DNS zone, and supports an array of DNS providers. DNSControl can also integrate with OctoDNS.
CloudFlare
There are plenty of quality DNS providers, and for most users they differ little. Most within the IT community know CloudFlare for DDoS protection, and infamously for protectingLulzSec’s website. CloudFlare does more than just protecting a site from attacks. They can optimise your site’s content, add TLS, distribute content via their CDN and reduce the costs of running your site. CloudFlare provides all this through their extremely reliable and resilient DNS service.
CloudFlare don’t host your website, rather they route traffic through server servers. This routing allows them to make decisions over which connections get through, which connections hit cache, and which connections to reject. The thought of routing your websites traffic through a provider you might not know often makes people worried. It's a valid concern that CloudFlare might see your plaintext traffic, but I think the benefits outweigh the risks. Troy Hunt discusses the risks and benefits of CloudFlare in his post, “CloudFlare, SSL and unhealth security absolutism”.
I’ve used CloudFlare since it’s foundation in 2009, migrating my own domains, friends and even several workplaces to CloudFlare. For most people and organisations, the free tier will provide enough services and protection. If you want extra options, like custom certificates, you might need to upgrade to Pro or Business. If you're running large websites, reach out to CloudFlare and discuss their Enterprise plan.
When selecting a DNS provider, you really need to look at their reliability and availability over the past few years. Have they suffered any major outages? Did these outages impact customers? I find duckduckgo.com to be the best research tool. A good starting point would be providers that DNSControl support.
DNSimple
DNSimple are a relative new player to the domain registry and DNS provider market. In the last 8 years they've made a significant impression on the industry. DNSimple boasts a fantastic API, Slack integration, a great certificate purchasing experience, a range of TLDs and an excellent team support. I particularly like their sandbox environemnt to help developers work with their API.
At Readify, we have used DNSimple for domain registration, DNS hosting and particularly for SSL certificates for a few years. I recently made the decision to move from Namecheap, who I joined in 2003 over to DNSimple. I had some issues with my migration, I'll put together a write up later.
Don’t believe me? There are plenty of big names using DNSimple including Scott Hanselman and Troy Hunt, who provides an entertaining comparison of GoDaddy and DNSimple.
If you want to give DNSimple a go, use my referral code and get some credits on your subscription.
Git, GitHub and VSTS
Using a version control system is a core piece of this puzzle. Git provides us with history of all changes and who performed each change. Git encourages collaborative work; multiple people can make changes to a DNS zone without interfering with each other. Git branches are cheap and easy to merge, allowing for developers and engineers to make changes, verify them and them push them into production.
Platforms like GitHub, Bitbucket and Visual Studio Team Services (VSTS) extend Git with Pull Requests. Pull requests allow a person to ask another to review their changes and push them into a different branch or repository. The pull request process encourages discussions around work and changes, and we use rules to control who can review and approve changes. Pull requests are like change requests in ITIL, but they occur more quickly and more often, and don’t require a meeting to complete.
VSTS also provides a rich build and release pipeline experience. Automation of build, testing and release processes has accelerated the delivery of software and given rise to DevOps.
For this article, I host the DNSControl repository in GitHub and the build and release pipelines are in VSTS, but you could set this up using GitLab, AppVeyor, Travis CI or TeamCity.
Azure Key Vault
Key Vault helps you to protect cryptographic keys, certificates and secrets used within your cloud applications and within your CI/CD processes. Hardware Security Modules (HSMs) can be optionally used to protect keys and secrets, access policies can also be used to control access to Key vault.
Why is this important for a project like this one? DNSControl will need access (via API keys/tokens) to your DNS Provider(s) and your domain registrar. These are obviously sensitive credentials! An attacker with these could change your DNS, hijack our domains, buy other services or even take control of our domains.
Using VSTS variable groups, we can access Key Vault as part of the build and release pipeline.
I recommend storing your API tokens, in this case those for DNSimple and CloudFlare, in Key Vault.
With Planet PowerShell I also stored the Azure App Service IP address and URLs in Key Vault. This is purely a personal preference, I just wanted to keep all my application settings in a single place.
If you don't have an Azure Subscription, you can use the private/encrypted option within the VSTS variable groups to store your sensitive information.
Docker
There are 2 benefits for using the containerized version of DNSControl.
Releases are more frequent for the Docker container. Whenever code is pushed to master and successfully built, the docker image (latesttag) is updated. This provides a faster release cycle and you'll get bug fixes and new features faster than the Windows, MacOS or Linux releases.
Another advantage of using Docker is that we don’t need to install anything on your system (provided you have Docker). I'm trying to keep my installed application base smaller on my personal laptop fleet (MacBook, Dell Precision and Razer Blade Stealth). By using Docker, I don’t have to install Go or DNSControl onto laptios or VSTS Agents.
If you want to join the Cult of Docker, we now have t-shirts!
Working with the DNSControl file
There are two files that we need to define to manage your DNS zones with DNSControl. The first is dnsconfig.js; this is a JavaScript file that will contain the definition of your zone(s). You define the credentials for accessing your domain registry and DNS provider in the creds.json file.
I recommend starting by setting up your creds.json file. The required entries are going to be different for each provider, look at the DNSControl documentation for more help. For Planet PowerShell, we have 2 entries, one for CloudFlare and one for DNSimple. It looks like:
{
  "cloudflare.com":{
    "apikey": "#{cloudflareapikey}#",
    "apiuser": "#{cloudflareapiuser}#"
  },
  "dnsimple": {
    "token": "#{dnsimpleapitoken}#"
  }
}
It's important that you don’t put any of your credentials into this file and then place it into a public Git repository. If you do that, someone might be able to hijack your domain! To support automated build and release, I use tokens within the creds.json file. The Replace Tokens task will replace any entries surrounded by #{ }#. For instance, #{cloudflareapikey}# will be replaced with the contents of the cloudflareapikey variable in VSTS.
The next step is to define your zone configuration. We place your definitions into dnsconfig.js, yes, this file is JavaScript, but we don’t have to be afraid it will be very easy!

Javascript: I have no idea what I am doing.
I start my configuration by defining some of the more static elements using variables. The first is to define a 1-hour TTL that's used for most of the Microsoft Office 365 entries. I like defining the TTLs here as it makes the configuration easier to read and understand.
//One Hour TTL
var hour_ttl = TTL(3600);
Next, I define my domain registrars. These are defined using NewRegistrar specifying the name of the credential used creds.json and the providers name. Planet PowerShell has a single NewRegistrar entry for DNSimple.
// Domain Registrars
var REG_DNSIMPLE = NewRegistrar("dnsimple", "DNSIMPLE");
DNS Providers follow the same structure, but we use NewDnsProvider. Planet PowerShell has two entries, one for CloudFlare and another for DNSimple. I don’t use DNSimple as a DNS provider, though I'm leaving that option open.
// DNS Providers
var DNS_CLOUDFLARE = NewDnsProvider('cloudflare.com','CLOUDFLAREAPI');
var DNS_DNSIMPLE = NewDnsProvider("dnsimple", "DNSIMPLE"); // Not actively used.
I then define three macros for CloudFlare. These make it easier to enable and disable the CloudFlare proxy services within the file. They also make the configuration easier to read.
// CloudFlare Macros
var cloudflare_on = {cloudflare_proxy: 'on'};
var cloudflare_off = {cloudflare_proxy: 'off'};
var cloudflare_full = {cloudflare_proxy: 'full'}; // enables raygun
We can then define the domain. We use the D language element, specifying the domain, registrar and then one or more DNS providers. We can also specify defaults like TTL or CloudFlare Proxy here as well.
//Planet PowerShell DNS
D('planetpowershell.com', REG_DNSIMPLE, DnsProvider(DNS_CLOUDFLARE),
Once the domain is defined, we can define our DNS records. DNSControl supports A, CNAME, TXT, SRV, MX etc. With each record, we can specify a custom TTL (as I've for the Office 365 related entries). We can also enable the CloudFlare services for the DNS entries we chose as well. One important thing to remember is that CNAME entries must have the trailing dot ‘.’. Entries for the root of the domain use ‘@’.
// Office 365 for email
CNAME('autodiscover', 'autodiscover.outlook.com.', hour_ttl),
CNAME('enterpriseenrollment', 'enterpriseenrollment.manage.microsoft.com.', hour_ttl),
CNAME('enterpriseregistration', 'enterpriseregistration.windows.net.', hour_ttl),
CNAME('lyncdiscover', 'webdir.online.lync.com.', cloudflare_on),
CNAME('msoid', 'clientconfig.microsoftonline-p.net.', hour_ttl),
CNAME('selector1._domainkey', 'selector1-planetpowershell-com._domainkey.kieran365.onmicrosoft.com.', hour_ttl),
CNAME('selector2._domainkey', 'selector2-planetpowershell-com._domainkey.kieran365.onmicrosoft.com.', hour_ttl),
CNAME('sip', 'sipdir.online.lync.com.', hour_ttl),
MX('@', 1, 'planetpowershell-com.mail.protection.outlook.com.', hour_ttl),
SRV('_sip._tls', 100, 1, 443, 'sipdir.online.lync.com.', hour_ttl),
SRV('_sipfederationtls._tcp', 100, 1, 5061, 'sipfed.online.lync.com.', hour_ttl),
TXT('@', 'MS=ms63098003', hour_ttl),
There are two approaches for defining a domain's SPF record. You can define it using a TXT entry, much like every other DNS provider; or you can use DNSControl’s SPF Builder as I have with Planet PowerShell. The SPF builder can do things like flattening entries and removing duplicates. The SPF builder makes it easier to read and document your organisation’s SPF entries as well. The output of the SPF Builder is the usual TXT record.
There's an often-debatable rule within the SPF standard that only 10 DNS lookups are allowed, unfortunately it is unknown how many ISPs and mail providers enforce this limit. Flattening helps us reduce the number of lookups so that it fits within the limit. I recommend a through audit of your SPF records before you use flattening. For more information on DNSControl’s SPF Builder, check out the documentation.
// SPF Record
SPF_BUILDER({
  label: "@",
  overflow: "_spf%d",
  raw: "_rawspf",
  parts: [
    'v=spf1',
    'include:spf.protection.outlook.com', // Office 365
    '-all' // Reject all non-matched addresses
  ],
  flatten: []
}),
The final file looks like this:
//One Hour TTL
var hour_ttl = TTL(3600);

// Domain Registrars
var REG_DNSIMPLE = NewRegistrar("dnsimple", "DNSIMPLE");

// DNS Providers
var DNS_CLOUDFLARE = NewDnsProvider('cloudflare.com','CLOUDFLAREAPI');
var DNS_DNSIMPLE = NewDnsProvider("dnsimple", "DNSIMPLE"); // Not actively used.

// CloudFlare Macros
var cloudflare_on = {cloudflare_proxy: 'on'};
var cloudflare_off = {cloudflare_proxy: 'off'};
var cloudflare_full = {cloudflare_proxy: 'full'}; // enables raygun

//Planet PowerShell DNS
D('planetpowershell.com', REG_DNSIMPLE, DnsProvider(DNS_CLOUDFLARE),
  // Production Site
  A('@', '#{productionip}#', cloudflare_on),
  TXT('@', '#{productionappserviceurl}#'),
  A('www', '#{productionip}#', cloudflare_on),
  TXT('www', '#{productionappserviceurl}#'),

  // Production Staging Slot
  A('staging', '#{productionip}#', cloudflare_on),
  TXT('staging', '#{productionstagingappserviceurl}#'),

  // Development Site
  A('dev', '#{developmentip}#', cloudflare_on),
  TXT('dev', '#{developmentappserviceurl}#'),

  // Development Staging Slot
  A('devstaging', '#{developmentip}#', cloudflare_on),
  TXT('devstaging', '#{developmentstagingappserviceurl}#'),

   // Office 365 for email
  CNAME('autodiscover', 'autodiscover.outlook.com.', hour_ttl),
  CNAME('enterpriseenrollment', 'enterpriseenrollment.manage.microsoft.com.', hour_ttl),
  CNAME('enterpriseregistration', 'enterpriseregistration.windows.net.', hour_ttl),
  CNAME('lyncdiscover', 'webdir.online.lync.com.', cloudflare_on),
  CNAME('msoid', 'clientconfig.microsoftonline-p.net.', hour_ttl),
  CNAME('selector1._domainkey', 'selector1-planetpowershell-com._domainkey.kieran365.onmicrosoft.com.', hour_ttl),
  CNAME('selector2._domainkey', 'selector2-planetpowershell-com._domainkey.kieran365.onmicrosoft.com.', hour_ttl),
  CNAME('sip', 'sipdir.online.lync.com.', hour_ttl),
  MX('@', 1, 'planetpowershell-com.mail.protection.outlook.com.', hour_ttl),
  SRV('_sip._tls', 100, 1, 443, 'sipdir.online.lync.com.', hour_ttl),
  SRV('_sipfederationtls._tcp', 100, 1, 5061, 'sipfed.online.lync.com.', hour_ttl),
  TXT('@', 'MS=ms63098003', hour_ttl),

  // SPF Record
  SPF_BUILDER({
    label: "@",
    overflow: "_spf%d",
    raw: "_rawspf",
    parts: [
      'v=spf1',
      'include:spf.protection.outlook.com', // Office 365
      '-all'
    ],
    flatten: []
  }),

  // DMARC Policy
  TXT('_dmarc', 'v=DMARC1; p=reject; pct=100; rua=mailto:[email protected];', hour_ttl),

  // Bing verification code
  CNAME('e78ba70a1ddd92486f0b2007c4cf502d', 'verify.bing.com.', hour_ttl),

  // Google verification code
  TXT('@', 'google-site-verification=cOCEohtWpoLaMz8kDb07P1l-_W4MSpJRCQkk7WhiW7Y', hour_ttl),

  // Uptime Robot Status
  CNAME('status', 'status.uptimerobot.com.', cloudflare_on)
);
Setting up a build and release
Setup a Git Repository
I'm assuming you have a GitHub account. Create a repository and clone it to your local system. Make your dnsconfig.js and creds.json files, commit the changes and push them to GitHub. If you want a great place to start, check out Planet PowerShell’s Infrastructure repo.
I placed my DNSControl files into a folder called dns. You can keep this structure, if you don’t, you might need to make some changes to the paths in the build and release pipelines.
The build pipeline will need permission to commit to GitHub. To authenticate, we will use a Personal Access Token (PAT). Create a token and save it for later (we will put it into Key Vault).
Setup VSTS
I'm going to assume you already have a VSTS organisation and that you have defined a project.
You'll need to install the Replace Tokens extension from the Marketplace. If you're not an administrator of the VSTS organisation, ask your administrator to do so.
Create an Azure Service Principal and a VSTS ARM endpoint. This will allow VSTS to access your Azure subscription and the Key Vault you'll create shortly. Michael Hansen’s blog post “Granular VSTS/TFS Deployment Privileges using Services Principals” is a great guide to creating principals.
I'm using the new preview navigation and build and release views. Some things might look different, and some navigation items maybe be different if you're not using these. I've also customised my project to switch off the Work, Code and Test services.
Setup Key Vault
Create an Azure Key Vault within your Azure Subscription. Define an access policy that allows the service principle you created earlier to get and list secrets within the Key Vault.
Key Vault access policies.
Create a new secret for each of the API tokens and for the GitHub PAT token. Ensure that the name of the secret matches the token names contained within your dnsconfig.js and creds.json files.
Secrets in Key Vault.
VSTS Variable Groups
Before we define any build or release pipelines we need to define a variable group. Variable groups allow us to store values that we want to use across multiple build and release pipelines.
Creating a variable group is quite simple:
- Navigate to the Builds and release hub, and then to Library.
- Create a new variable group selecting + Variable Group.
- Start by providing a unique and descriptive name for the group. Optionally provide a description about what the group is used for.
- Select the Link secrets from an Azure key vault as variables option. You can either re-use an existing Azure service connection or create one.
- Select the Key Vault you created before. If you receive an access denied message, ensure that your Key Vault’s access policies allow you and the VSTS service principle to access the secrets.
- You can now add variables from Key Vault by selecting + Add and then selecting which secrets we want in the variable group.
- Once you have everything selected, use the Save option.
VSTS variable group.
Create a Build pipeline
What tasks do we need to do as part of the build? I see 5 clear steps:
- Replace the tokens within
dnsconfig.jsandcreds.json. - Run
DNSControl check. This validates the syntax of the file. - Run
DNSControl preview. This validates the file against our domain registrar and DNS providers. It will also output a list of changes that it will make. - Commit any changes to the
spfcache.jsonfile. This file is updated as part of DNSControl’s SPF Builder. - Publish the contents of the artifact staging directory as a new build artifact.
Now that we have an idea of what the build should look like, let’s set one up in VSTS.
Let’s create a new build pipeline:
- Navigate to the Builds and release hub, and then to Builds.
- Create a new pipeline by selecting the + New button.
- Select the platform where your Git repository is hosted. For Planet PowerShell, I selected GitHub, and then the correct repository.
- Select your Master branch as the default branch.
- Hit Continue.
- When asked to select a template, use the Empty process option.
- You'll now see a blank build pipeline.
- Enter a descriptive name. Remember this name is used for alerts and dashboards, so pick a clear and descriptive name.
- I opted to the Hosted Linux Preview agent. You can use one of the others, but the file paths might be different. If you plan to use a private agent, you'll need Docker installed.
Add some build tasks by hitting the + beside the first build phase (you can optionally change the name of the phase if you wish). Add these tasks (in order):
- Copy Files
- Replace tokens
- Docker
- Docker
- Command Line
- Copy Files
- Publish Build Artifacts
The copy files task:
Display Name: Copy Files to: $(Build.ArtifactStagingDirectory)
Source Folder:
Contents:
!(**/.git\**)
 **/dns/**
Target Folder: $(Build.ArtifactStagingDirectory)
This task copies the files from the repository working directory to the staging directory. The contents of the staging directory will become the build artefact that the pipeline produces.
The replace tokens task:
Display Name: Replace tokens in /*.json /*.js
Root Directory: dns
Target Files:
creds.json
 dnsconfig.js
The Replace Tokens extension will replace tokens (usually defined as within
#{ }#) with VSTS variable values.The first Docker task:
Version: 1.* (preview)
Display Name: Run DNSControl Check
Container Registry Type: Container Registry
Docker Registry Service Connection:
Command: run
Image Name: stackexchange/dnscontrol
Qualify image name: unchecked
Container name:
Ports:
Volumes: $(System.DefaultWorkingDirectory)/dns/:/dns
Environment variables:
Working directory:
Entry point override:
Command: dnscontrol check
Run in background: unchecked
While I could skip the
checkand go straight to thepreviewcommand, I like to run both as it provides clearer build failure messages. If a build fails on thechecktask, I know there's a problem with the syntax of the file.The second Docker task:
Version: 1.* (preview)
Display Name: Run DNSControl Preview
Container Registry Type: Container Registry
Docker Registry Service Connection:
Command: run
Image Name: stackexchange/dnscontrol
Qualify image name: unchecked
Container name:
Ports:
Volumes: $(System.DefaultWorkingDirectory)/dns/:/dns
Environment variables:
Working directory:
Entry point override:
Command: dnscontrol preview
Run in background: unchecked
The command line task:
Display Name: Commit spfcache.json back
Script:
mv $(System.DefaultWorkingDirectory)/dns/spfcache.updated.json $(System.DefaultWorkingDirectory)/dns/spfcache.json
 git config user.email "[email protected]"
 git config user.name "PlanetPowerShellVSTS"
 git add dns/spfcache.json
 git commit -m "Updated spfcache.json ***NO_CI***"
 git push https://$(GitHubPat)@github.com/planetpowershell/planetpowershell-infrastructure.git HEAD:master
Control Options:
Run this task: Custom Conditions
Custom condition: and(succeeded(), eq(variables['Build.SourceBranch'], 'refs/heads/master'))
If you don’t use the SPF builder, you can skip this step entirely.
DNSControl keeps a local cache of the DNS lookups it performs during the SPF optimization process. It does this so that we can still perform
pushoperations even if third-party DNS servers are down.The cache is kept in a file called
spfcache.json. DNSControl will prevent a push operation from happening if this file is absent.During a preview operation, if there are updates to be made, or file doesn't exist, then DNSControl will create/update the file
spfcache.updated.json. We need to rename this file tospfcache.jsonand commit it back to Git to ensure availability of the entries.VSTS Builds are performed using a disconnected head. To be able to push from VSTS back to GitHub, we need to specify the path to the repository and a PAT for authentication.
Note the use of
***NO_CI***in the commit message. This prevents the commit from triggering another VSTS build.This task should only occur for builds based on the
masterbranch. You can use a control condition to restrict the execution of the task to the master branch.The second copy files task:
Display Name: Copy spfcache.json to: $(Build.ArtifactStagingDirectory)
Source Folder: dns
Contents:
spfcache.jsonTarget Folder: $(Build.ArtifactStagingDirectory)
Advanced:
Overwrite: Enabled
Just in case the spfcache.json file has been updated, we need to push the file to the artefact staging.
Publish build artifacts task:
Display Name: Publish DNS Build Artifact
Path to publish: $(Build.ArtifactStagingDirectory)
Artifact Name: dnscontrol$(Build.SourceBranchName)$(Build.BuildNumber)


Now that we have the tasks defined, there are a few more things we still need to configure before this will all work.
Let’s start with linking a variable group:
- Select Variables and then Variable groups.
- Select Link variable group and select the variable group you selected earlier.
Linking a variable group.
When the build starts, VSTS will load the secrets defined in the group will be fetched from Key Vault and made available as VSTS variables.
We want builds to run:
- When changes are merged into master, and,
- When a pull request is created to validate the changes made.
Let’s configure the build integration:
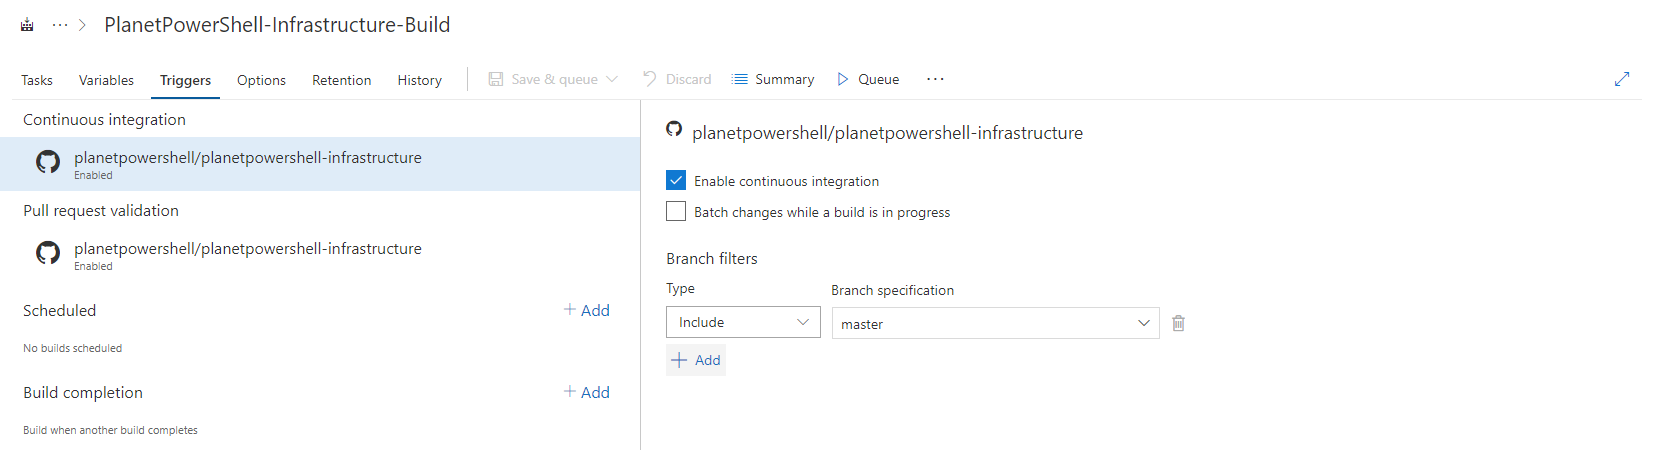
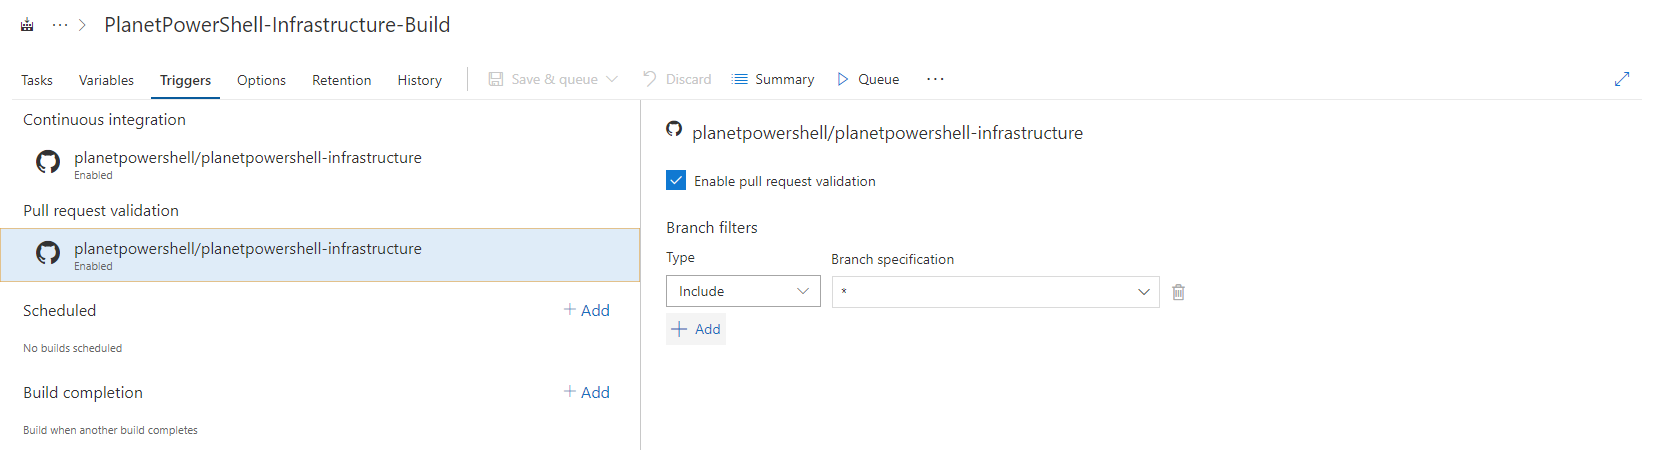
- Select Triggers, under Continuous integration.
- Select Enable continuous integration and specify the branch filters of Type: Include and Branch Specification: Master.
- Under Pull request validation, select Enable pull request validation and specify the branch filters of Type: Include and Branch Specification: *.
Finally, I want to tweak some of the build options:
- Select Options.
- Change the Build number format to $(Build.SourceBranchName)-$(date:yyyyMMdd)$(rev:.r).
- If you want status badges, enable them here as well.
Build Options.
Congratulations, you're now ready to run a build! Select Save & Queue to save the build pipeline definition and start a new build. If everything has been specified correctly, your build should succeed.
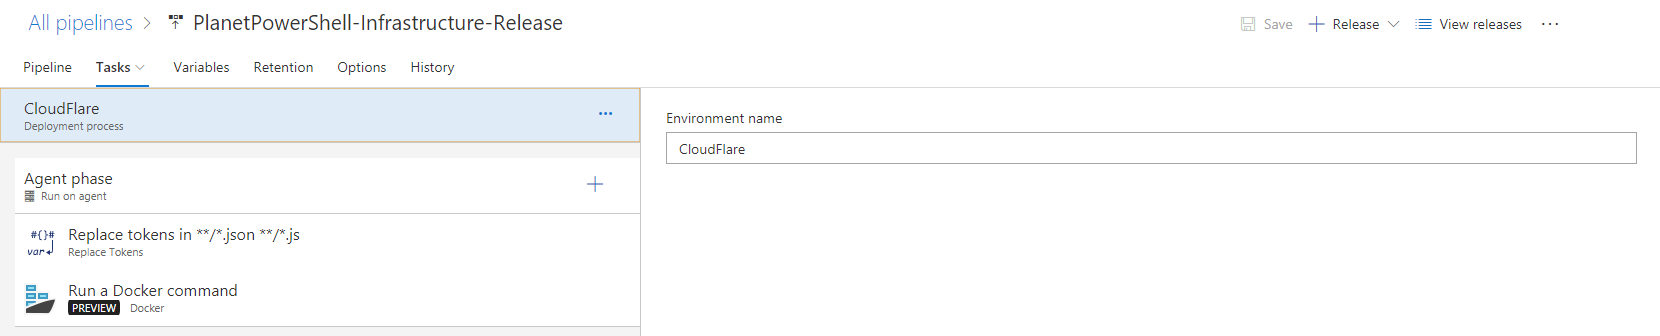
Create a Release pipeline
What tasks do we need to do as part of the release? I see 2 steps:
- Replace the tokens within
dnscontol.jsandcreds.json. - Run
DNSControl push. This validates the syntax of the file.
Let’s create a new release pipeline:
- Navigate to the Builds and release hub, and then to Releases.
- Create a new pipeline by selecting the + button and then Create a release pipeline.
- When asked to select a template, use the Empty process option. You'll now have an empty release pipeline.
- Under Artifacts, select + Add.
- Select the project and source and select Add.
- Select the lightning icon from the top right corner of the artifact.
- Enable the continuous deployment trigger.
- Under Build branch filters, click the down arrow beside + Add button and select The build pipeline’s default branch.
- Select Tasks and Environment 1.
- Rename the environment to something more appropriate.
- Select Agent phase.
- Change the Agent queue to Hosted Linux Preview. As with the build pipeline, you change this to a different agent queue or use a private agent.
Add some tasks by hitting the + beside the agent phase (you can optionally change the name of the phase if you wish). Add these tasks (in order):
- Replace tokens
- Docker
The replace tokens task:
Display Name: Replace tokens in /*.json /*.js
Root Directory: dns
Target Files:
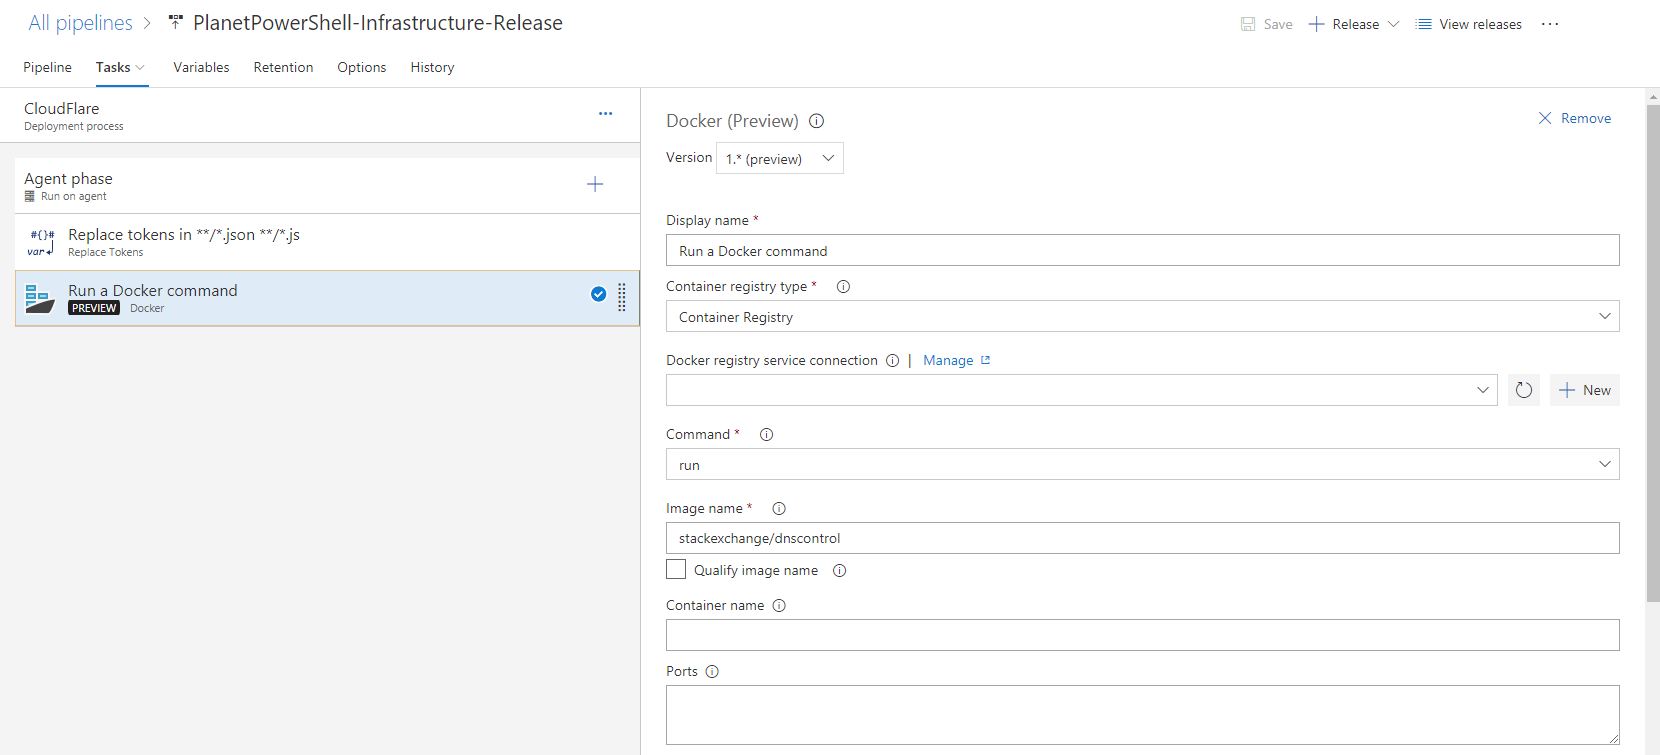
creds.json
 dnsconfig.js
The Docker task:
Version: 1.* (preview)
Display Name: Run DNSControl Check
Container Registry Type: Container Registry
Docker Registry Service Connection:
Command: run
Image Name: stackexchange/dnscontrol
Qualify image name: unchecked
Container name:
Ports:
Volumes: $(Agent.ReleaseDirectory)/PlanetPowerShell-Infrastructure-Build/dnscontrol$(Build.BuildNumber)/dns/:/dns
Environment variables:
Working directory:
Entry point override:
Command: dnscontrol push
Run in background: unchecked


Now that we have the tasks defined, there are a few more things we still need to configure before this will all work.
Let’s start with linking a variable group:
- Select Variables and then Variable groups.
- Select Link variable group and select the variable group you selected earlier.
Linking the variable group.
Finally, I want to tweak some of the build options:
- Select Options.
- Change the Release name format to $(date:yyyyMMdd)$(rev:.r).
- If you want to use badges, you can enable those under Options and Integrations.


Congratulations, you're now ready to save and run your first release. Hit save and then release to trigger your first release. If everything is configured correctly, DNSControl should push any DNS changes you have made to CloudFlare.
How does it all work?
Let’s see how this once this is all setup by looking at a real situation.
I want to add another entry to Planet PowerShell’s DNS, a CNAME that will point to an Uptime Robot status page. I need to create a CNAME that directs status.planetpowershell.com to stats.uptimerobot.com.
I start by creating a new branch, uptimerobot, and then adding this to dnsconfig.js:
// Uptime Robot Status
CNAME('status', 'stats.uptimerobot.com.', cloudflare_on)
I can then create a pull request to merge the branch uptimerobot into master.
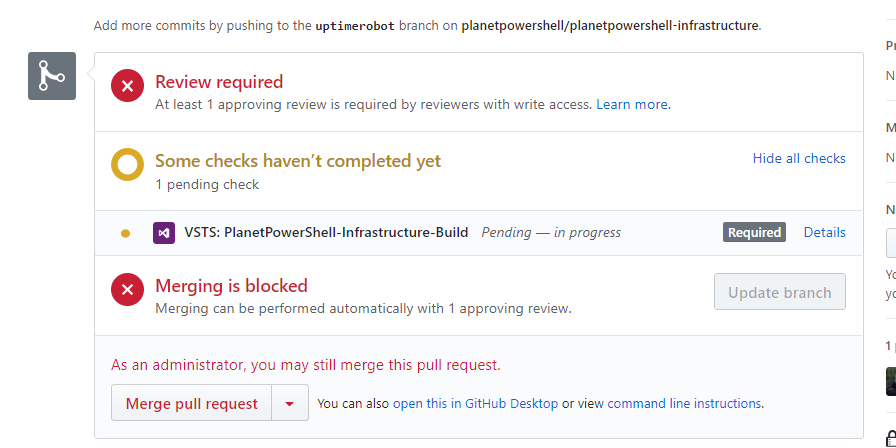
Pull request waiting checks to complete.
Once the pull request has been created, you'll see that status checks are pending, and that merging is blocked. Once the build has been completed, and everything is ok, the checks should pass. You can view the status of the build within VSTS.
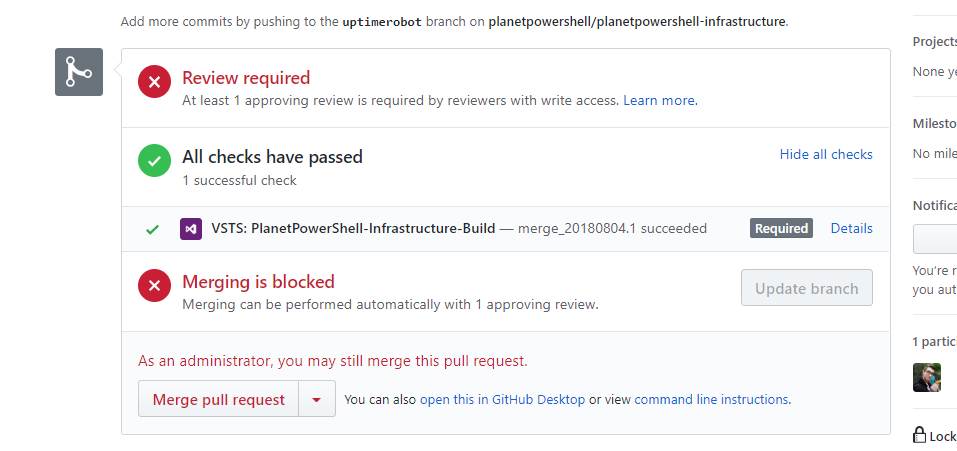
Pull request with checks complete, waiting for review and merging.
Changes to the master branch require status checks be successful and a code review. When the change is approved (or if an administrator ignores the review rule), then the pull request is completed, and the changes merged into master. This will trigger a new build and a release.

Master branch build.

Release successful.
Congratulations, you have made a change without even touching a DNS console. You have a clear record of who made the change, why it was made and what the change was.
Current Issues
Right now, there's one issue with this process. Microsoft has temporarily removed support for pull request validation for forked repositories. Pull requests based upon branches of the main repository currently work, just not forks. If you don’t deal with forks, then this shouldn’t be an issue.
I'll update this article once Microsoft re-enables support.
Next Steps
How could we improve things?
Testing and verifying the changes once they've been made is the obvious next steps. I might look at writing some sort of testing framework that can check that changes have been made. Some level of replication monitoring like DNSChecker.org or Whatsmydns.net could also be beneficial.
Thank you
Thank you all for reading this massive write-up. I hope you get as much out of reading and implementing some of what I've written as I've had writing it.