
Between personal, community and team projects, I am involved in the maintenance of over 30 PowerShell modules. I have two recommendations to anyone starting with PowerShell, read the community style and formatting guidelines, and most importantly, standardise your work. I have developed a structure for all of my projects over the years, and now that I am performing more mentoring and code reviews I thought I would share some of my tips.
In the past, I would manually create the framework for my new modules. I would create a folder, copy some files from a previous project, rename some things, etc. It was ALL MANUAL! A few weeks, ago I attend the Melbourne PowerShell Meetup where a fellow Cloud and Datacenter MVP, Rob Sewell spoke about how he uses Plaster. Rob did a wonderful job showing how Plaster and Pester can be used to develop PowerShell modules and got me thinking about how I too could make use of Plaster.
I grabbed a copy of Rob’s Plaster template and then set about making it my own and changing it to meet my requirements. Going through the process of making my own template caused me to critically look at some of the decisions I was making when creating new modules and thought that others might benefit from hearing some of my thought process.
Why use Plaster?
The reason you should use Plaster is to save time!
If you have spent much time doing web development, Plaster is a like Yeoman but with a PowerShell focus. With Plaster, I create a template that defines the structure of my modules including what files and folders should be created. The next time I want to create a new module, I use Plaster, specify the template and some parameters and presto! The module has been created just as I like.
Plaster allows us to quickly make modules that follow the same structure and allows us to get on with coding and delivering quality PowerShell code.
Why should you standardize your file and folder layout?
Sticking to some simple rules about where you place your module’s code, including folder structure, will help you as a maintainer and anyone else who might want to contribute.
Each module needs a starting point, and for PowerShell modules, that will be a root folder. This root folder will have the same name as the module and the psd1 and psm1 files.
I create a new Git repository for each module, even if it is for internal projects or I am experimenting with something. This goes for repositories in VSTS and GitHub. The reason for this is that it keeps items like issues, pull requests, build, and release pipelines separate. This might seem like a bit messy, and you might be worried about having many repositories, however the cost of repositories is free or negligible, and with this structure I know that a pull request on my Posh-SYSLOG module will only impact a single module.
Now I don’t place any functions within the psm1 file, instead each function has its own ps1 file. The benefits of maintaining one function per file are:
- Functions are clearly defined and contained,
- It is easier to see read and search through the modules code,
- Adding new functions is easier,
- Removing functions is easier,
- The option to reuse functions is possible (as it is often as simple as copying the file), and
- Reviewing changes to code is easier, especially for GitHub pull requests as a change to a function only impacts a single file.
Obviously, I don’t leave the ps1 files sitting within the root folder. In most of my current modules, you will see that all of the functions are placed in a folder aptly named functions. I am now separating these to:
- Public functions, that is, functions intended for users are placed in
functions; - Internal functions, those that shouldn’t be available to users are placed in
internal.
There is a simple reason to maintain separate folders. It allows for anyone looking at the code to quickly and visually determine which functions will be exposed to an end user of the module. There is no digging around in files to determine which functions should be, and which ones should not be available to the user.
So, what do I put in the psm1 file? For many years, my psm1 file has contained some dynamic loading code from the Chocolatey project. I have recently switched this code for that created by David Christian. The advantage of David’s code is it correctly handles all the file and folder structure and it only exports those functions I intended to make public.
Since PowerShell 5, there has been support for classes in PowerShell. I think it makes sense to place each class within its own folder, and to place them into a folder of their own, classes. Classes should be placed within their own ps1 files bearing the name of the class.
You are writing Pester tests, aren’t you??? I prefer to give a similar treatment to my Pester files, so I put them into a folder called tests.
The last folder I want to discuss is resources. I use this folder to place any additional files, like executables, template files, or other files that my module may need and that need to be maintained in source control.
Helping users with a Readme and Change Log
I must admit, I haven’t done an excellent job maintaining readmes and change logs for my PowerShell modules. Most of my modules don’t have either of these files, so to encourage me to keep and maintain these files, I have created two template files, README.MD and CHANGELOG.MD.
Using the template file functionality in Plaster, the template will create a readme file containing a description of the module, the author (that’s you), information on how to install, update and even remove the module.
If you are hosting your module on GitHub, your README.MD is incredibly important. When you browse to a repository on GitHub, this file will be rendered (from markdown) as the homepage. What I have learnt is that this is one of your big opportunities to sell your code to the world, it isn’t just about talking about how to install and use the code, but also sell you as a professional.
Including a License
One thing that is often overlooked in the PowerShell community is licensing. No, I am not talking about charging money for your modules, I am talking about open source licenses.
Whilst the licensing of a PowerShell module might not seem important for you, I can ensure you that for some, it is extremely critical. In some organisations, developers and administrators may not be able to use an application or library unless they can clearly determine what license is applied to it.
My preference is for the MIT license, firstly, it is really short and easy to understand, others can be extremely long and discourage people from reading and understanding what they are agreeing with. The MIT license contains conditions requiring the preservation of the original copyright and license notices whilst allowing commercial use, modification, distribution, and private use. Importantly, it clearly defines your liability or lack thereof.
The License parameter within the Plaster template controls if the license is included in any new module that you are creating.
A great tool to assist in deciding what License is right for your project is ChooseAlicense.com. It asks you a few questions and will then make recommendations. Github also provide some great guidance on licenses too.
Include customized VS Code settings
After many years of using the PowerShell ISE and ISE Steroids, I have made the switch to using Visual Studio Code as my primary PowerShell IDE. One of the things I love about VS Code is that it is highly customable.
With VS Code we can specify a variety of settings that impact how our PowerShell is formatted, for instance:
- Tabs or spaces?
- Tab size. Do you like 2 spaces or 4?
- Where to place open and close braces? Same line? New line?
- Do we insert of whitespace after operators?
- Etc
Now some of these things are personal preferences, however I want each of the projects I work on to follow the same format, no matter who is working on the code base. After all, maintaining a uniform coding style across a project assists in its maintenance!
You can actually specify VS Code settings at a global and at a project level. By specifying how I want the code to be formatted using the settings.json file located in .vscode within your project’s root folder I can ensure that anyone who works on the code will produce the same code.
I also like to include some common tasks that I often want to run from within VS Code. In my template, I currently only include a task to run Pester tests that has been taken from the template included with Plaster. The tasks.json file defines what shell and what tasks can be executed.
Encouraging the use of Pester
One of the things I have been trying to push more for my personal projects is the creation and maintenance of Pester tests. Testing is crucial for delivering reliable code, and Pester provides us with a foundation to create reusable tests for our code.
Rob’s original template included some Pester scaffolds based upon the work of June Blender. June was a driving force behind PowerShell’s documentation and Sapien’s PowerShell HelpWriter.
These scaffolds separate tests into:
- Unit tests – testing individual functions in isolation.
- Comment based help tests – validating that comment based help has been written.
- Feature Tests – Do the features of the module work as a whole?
- Project tests – Focus on Script Analyzer and that the module loads cleanly.
I have taken these and made some minor modifications. My modifications of Rob and June's templates were just to fix some performance issues I had seen, and to separate the project and help test exceptions into separate files (that are now txt files).
I have included a rough guide on the different files in README_TESTS.md.
Encouraging contributions via GitHub
It is often said that GitHub is the social network for coding. Users can interact with projects, create issues, share knowledge, and contribute to projects together. GitHub isn’t just for hardcore software developers, it is also a place for script developers like PowerShell developers!
It isn’t just open source, Linux types that use GitHub. Microsoft is now one of the biggest organisations on GitHub and one of the biggest contributors. Don’t believe me? PowerShell, Pester, Plaster and even the Azure PowerShell modules can all be found on GitHub. If you haven’t created a GitHub account, now is the time to make a start.
As a developer, putting your code up on GitHub is a great start. It can allow you to participate in the PowerShell community and develop a public profile. If you want others to get involved in your own projects, then you need to take some steps to encourage them.
One step I believe is a fantastic way to encourage participation is to define a code of conduct. Now you often associate these with larger projects, however, I believe they are a positive sign, a sign of a welcoming and inclusive project no matter what size the project is. A code of conduct will define how you will treat people, and how you expect as a project maintainer to be treated. There are several sites that provide resources for developing a code of conduct, I used Contributor Covenant as I liked the style and language it uses.
There are three other files that I recommend that you include, a guide to contributing (contributing.md) and issue and pull request templates (issue_template.md and pull_request_template.md). I based all three of the files contained in my Plaster template on the Atom project, but you can really put whatever you want into them, there really isn’t a set structure.
Issue and pull request templates are a fantastic idea as they allow you, the maintainer, to provide some prompts or hits as to what should be included. For instance, in the issue template I ask about what operating system and PowerShell version a user is running; helping me to reproduce the issues that a user might have.
Not all of my projects are hosted on GitHub, so I used a Plaster parameter, GitHub, to control the creation of these files.
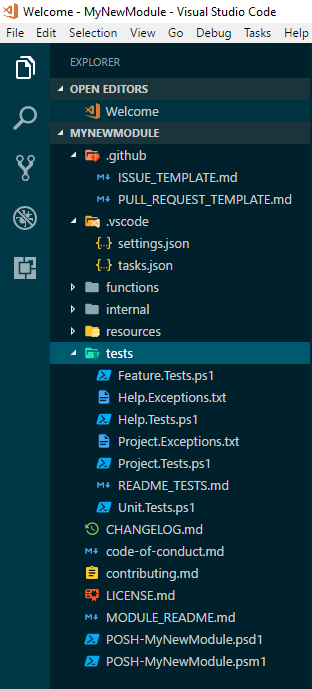
The final layout
The final layout for a project would look something like this when viewed from VS Code:
Using this Plaster template
Installing Plaster
You can install Plaster from the PowerShell Gallery
PS> Install-Module -Name PlasterClone the template
You can obtain the template from its GitHub Repository, from the command line you can use the following command to clone it to your local system.
PS> git clone https://github.com/poshsecurity/PlasterTemplateCreating a new module
Now that you have template locally, you can run Invoke-Plaster to create a new module based upon the template.
I typically follow this workflow:
- Create a public (or private) on GitHub
- Clone the repository locally
PS> git clone <Path to repository> Create a hash table containing the required parameters, and then call
Invoke-PlasterPS> $PlasterParameters = @{ TemplatePath = "<path to the Plaster Template above>" DestinationPath = "<path to the new repository you cloned>" AuthorName = "Cool PowerShell Developer" AuthorEmail = "[email protected]" ModuleName = "MyNewModule" ModuleDescription = "This is my awesome PowerShell Module!" ModuleVersion = "0.1" ModuleFolders = @("functions", "internal") GitHub = "Yes" License = "Yes" } PS> Invoke-Plaster @PlasterParameters- Plaster should then execute, creating the required files and folders.
- When you are ready you can push everything up to GitHub.
Congratulations you are ready to start coding!
Wrapping Up
You can get my Plaster Template here.
The benefits of using Plaster and a standardized structure for PowerShell module development are:
- Faster project start-up,
- Clear delineation of internal and public functions,
- Separation of functions, classes, tests, and resources, and,
- Simpler psm1 files.
We have also seen how we can use:
- Files like README.MD and CHANGELOG.MD to create better documentation.
- How to use a license provide users and other developers with guidance on how they can use and extend your code.
- We can customise VS Code on a per folder level, allow for uniform developer experience.
- Through testing with Plaster, using a standardised structure for our tests.
- How we can encourage contributions with a code of conduct, contribution guide and issues and pull request templates.
Big thanks to Rob Sewell for his Plaster template and June Blender for her Pester templates.
Kieran Jacobsen