AzurePublicIPAddresses module now supports the France and Germany Azure Regions
I'm pleased to announce that my PowerShell for working with Azure’s public IP address listings now supports the new Azure Regions in France and Germany. This release, 0.9, introduces some minor breaking changes, needed to support the Germany regions.

Map of Azure Regions as of February 2018
I'm pleased to announce that my PowerShell for working with Azure’s public IP address listings now supports the new Azure Regions in France and Germany. This release, 0.9, introduces some minor breaking changes, needed to support the Germany regions.
Each month of so, I check the Microsoft Azure Datacenter IP Ranges file for new regions. This month, I noticed that the France Central and France South are included.
The Azure Germany regions, Germany Northeast and Germany Central, are managed under a trustee model by T-Systems. This is like that of Azure in China. I hadn’t seen the German regions IP ranges before, but last week I found the file: Windows Azure Datacenter IP Ranges in Germany. My goal always was to support every available Azure Region, as such, I've now included these regions.
I must admit, I didn’t fully design this module to be future proof, I assumed all regions would be included in a single file. I first included Azure in China in version 0.8, with the -ChinaRegion parameter. While functional, this wasn’t future proof. To offer support for Azure Germany, version 0.8 includes some breaking changes in the Get-MicrosoftAzureDatacenterIPRangeFile CMDLet.
With version 0.9, I've removed the -ChinaRegion parameter and replaced it with -Region. This new parameter takes one of 3 values: Standard, China or Germany. This parameter now has this behaviour:
- Standard: the default value, downloads the Microsoft Azure Datacenter IP Ranges file.
- China: downloads the Windows Azure Datacenter IP Ranges in China file
- Germany: downloads the Windows Azure Datacenter IP Ranges in Germany file
If you were separately downloading the China region file, you'll need to ensure that you update your scripts logic.
I've also tweaked Get-MicrosoftazureDatacenterIPRange. The first change was to add support for the extra file to download, and the parameter change. I've also modified the logic around how the CMDLet stores the region information. I don’t expect these changes to cause any issues.
Getting the Module
If you have never used the module before, the easiest way to get AzurePublicIPAddresses is through the PowerShell Gallery:
PS> Install-Module -Name AzurePublicIPAddressesIf you already have the module installed, you can update the module from the PowerShell Gallery with:
PS> Update-Module -Name AzurePublicIPAddressesYou can also find the module on GitHub.
Found an issue? Then raise any bugs or feature requests via GitHub Issues.
Managing Windows Speculation Control Protections with PowerShell DSC
As part of their response to the Speculative Execution vulnerabilities, Spectre and Meltdown, Microsoft released updates for all supported systems. Microsoft made the decision to not enable these protections in Windows Server by default. It's up to you as the administrator to enable the protections.
As part of their response to the Speculative Execution vulnerabilities, Spectre and Meltdown, Microsoft released updates for all supported systems. Microsoft made the decision to not enable these protections in Windows Server by default. It's up to you as the administrator to enable the protections.
Microsoft’s used the reg command to make the registry changes. This tool is great on a single machine, but it doesn’t scale. You need to use a configuration management tool like PowerShell DSC to make the changes at scale.
These changes could be made using the registry DSC resource, but I wanted a more simplified configuration using a custom DSC resource. I looked, and couldn’t find a resource, so I created cSpeculationControlFixes.
Managing the Protections
With the cSpeculationControlFix resource, administrators can enable or disable the protections. You'll need to restart the system for the changes to take effect, cSpeculationControlFix will notify the LCM if a reboot is required.
Configuration EnableSpeculationControl
{
    Import-DscResource -Module cSpeculationControlFixes
    cSpeculationControlFix enableSpeculationControlFix
    {
        Status = 'Enabled'
    }
}
Spectre Variant 2
Microsoft now provides a mechanism for enabling and disabling the Spectre Variant 2 protections separately from the other protections. With the cSpectreVariant2 resource, an administrator can enable or disable just the Spectre Variant 2 protections. For this resource to work, you need to have the updates described in this knowledge base article. Once again, cSpectreVariant2 will notify the LCM if a reboot is required.
Configuration EnableSpectreVariant2
{
    Import-DscResource -Module cSpeculationControlFixes
    cSpectreVariant2 enableSpectreVariant2Fix
    {
        Status = 'Enabled'
    }
}

Configuration DisableSpectreVariant2
{
    Import-DscResource -Module cSpeculationControlFixes
    cSpectreVariant2 enableSpectreVariant2Fix
    {
        Status = 'Disabled'
    }
}
Anti-Virus Compatibility Flag
A massive issue with these updates is that Windows Update won't offer to install these updates unless your anti-virus product as created the appropriate compatibility flag. This issue is, what about those computers, mainly servers, that don’t have an anti-virus product installed? The truth is, these update, nor any further security updates will be available.
To combat this, the cSpeculationControlAVCompatibility resource allows and administrator to enable this flag on systems that don’t have an anti-virus installed.
Configuration EnablecSpeculationControlAVCompatibility
{
    Import-DscResource -Module cSpeculationControlFixes

    cSpeculationControlAVCompatibility enablecSpeculationControlAVCompatibility
    {
        Status = 'Enabled'
    }
}
Getting the Module
The easiest way to get cSpeculationControlFixes is using the PowerShell Gallery, or from GitHub.
Installing the module from the gallery is as easy as:
PS> Install-Module -Name cSpeculationControlFixesIf you discover any issues, please report then via GitHub Issues.
Kieran Jacobsen
Using Intune and AAD to protect against Spectre and Meltdown
I’m a big fan of Intune’s device compliance policies and Azure Active Directory’s (AAD) conditional access rules. They're one piece of the puzzle in moving to a [Beyond Corp][5] model, that I believe is the future of enterprise networks.
I’m a big fan of Intune’s device compliance policies and Azure Active Directory’s (AAD) conditional access rules. They're one piece of the puzzle in moving to a Beyond Corp model, that I believe is the future of enterprise networks.
Compliance policies allow us to define what it takes for a device (typically a client) to be considered secure. The rules could include the use of a password, encryption, OS version or even if a device has been jail-broken or rooted. In Intune we can define policies for Windows 8.1 and 10, Windows Phone, macOS, iOS and Android.
One critical thing to highlight is that compliance policies don’t enforce settings and don’t make changes to a device. They're simply a decision-making tool that allows Intune (and AAD) to determine the status of the device. If we want to make changes to a device, we need to use Intune configuration policies. It's up to the admin or the user to make a non-compliant device compliant.
A common misconception with compliance policies are that the verification process occurs in real-time, that is, when a user tries to login the device's compliance status is checked. The check occurs on an hourly basis, though users and admins can trigger off a check manually.
The next piece of the puzzle are conditional access policies. These are policies that allow us to target different sign-in experiences for different applications, devices and user accounts. A user on a compliant device may receive a different sign-in experience to someone using a web browser on some random unknown device.
How compliance policies and conditional access work together
To understand how Compliance Policies and Conditional Access works, let’s look at a user story.
Fred works in the Accounting department at Capital Systems. Fred has a work PC issued by Capital’s IT Team, and a home PC that he bought from a local computer store.
The IT team has defined two Conditional Access policies:
- For Office 365: a user can connect from a compliant device, or needs to pass an MFA check.
- For the finance system: the user can only connect from a compliant device and must pass an MFA check.
How does this work in practice?
When Fred tries to access his email from his work device, perhaps through a browser, AAD will check his device’s compliance status during login. As Fred’s work PC is compliant, it will allow access to his email.
Fred now goes home, on the train he remembers he forgot to reply to an important email. When Fred gets home, he starts his home PC and navigates to the Office 365 portal. This time, AAD doesn’t know the device, so it will treat the device as non-compliant. This time, Fred will be prompted to complete MFA before he can access his email.
Things are different for Fred when he tries to access Capital’s finance system. Fred will be able to access this system from his work PC as its complaint, assuming he completes an MFA request. Fred won't be able to access this finance system from his home PC as his device isn’t compliant.
These rules allow Capital System’s IT team to govern who can access an application, from what devices they can access it from, and if they need to complete MFA.
Ensuring Spectre and Meltdown Patches are installed
We can use compliance policies to check if a device’s OS version contains the Spectre and Meltdown patches. When Intune checks the devices compliance, if isn't running with expected patch level, it will be marked as non-compliant.
What does this mean for the user? In Fred’s case, if his work PC lacks those updates, he may receive extra MFA prompts and loose access to the finance system, until he installs the right patches.
The Intune portal and PowerBI can be used to generate reports on device compliance and identify devices that need attention. You can also configure Intune to email a user when their device becomes non-compliant. This email can be customised, I recommend that you include a link to a remediation guide or to your support system.
Configuring Intune Compliance Policies
Compliance policies can be created and modified in the Azure Portal via the Intune panel. Simply navigate to the Device Compliance and then Policies. You'll need to create a separate policy for each OS that you want to manage compliance.
Within a compliance policy, we specify an OS version using a “major.minor.build” formatted string.
The major versions numbers are:
- Windows 10 - 10.0 Note that the .0 is important*
- Windows 8.1 - 3
- macOS - 10
We can express things like Windows 10 Fall Creators, or macOS High Sierra using the minor version number.
- Windows 10 Fall Creators Update - 10.0.16299
- macOS High Sierra - 10.13
Finally, we can narrow down to a specific release or patch by using the build version number. For instance, the January updates for each platform are:
- Windows 10 Fall Creators Update - 10.0.16299.192
- macOS High Sierra - 10.13.2
You can specify the minimum and maximum OS version by navigating to Properties, Settings and then Device Properties.

Setting the minimum Windows 10 version in a compliance policy.
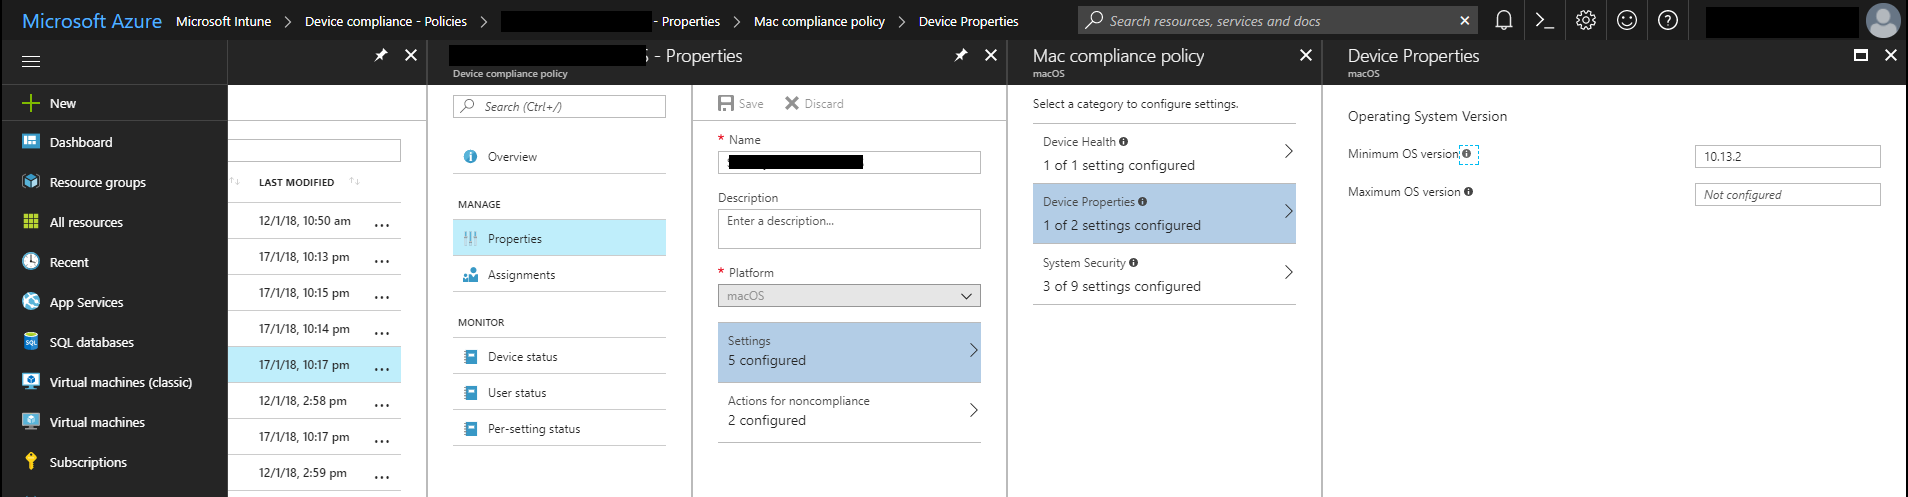
Setting the minimum macOS version in a compliance policy.
Once you have made this change, devices that don't meet the minimum version will be marked as non-compliant during their next compliance evaluation.
Kieran Jacobsen
Posh-SYSLOG 3.2.1 has been released
In early January, Ben Claussen reported that there was a date formatting issue in Posh-SYSLOG, I've released Posh-SYSLOG 3.2.1 to address these issues.
When I initially developed Posh-SYSLOG, I didn’t correctly follow RFC 3164. The timestamps sent had a leading zero for dates less than 10, but the RFC states this should be a leading space. I don’t know how much this impacted some users, and apologise for any issues.
In early January, Ben Claussen reported that there was a date formatting issue in Posh-SYSLOG, I've released Posh-SYSLOG 3.2.1 to address these issues.
When I initially developed Posh-SYSLOG, I didn’t correctly follow RFC 3164. The timestamps sent had a leading zero for dates less than 10, but the RFC states this should be a leading space. I don’t know how much this impacted some users, and apologise for any issues.
I want to thank Ben for putting together such a great issue, he included some recommended fixes and tested an updated version before its release.
As it stands, there are no outstanding issues, and only one feature request for Posh-SYSLOG. If you find any issues or want to make a feature request, please do so via a GitHub Issue.
You can get the new version from GitHub or from the PowerShell Gallery.
Kieran Jacobsen
Posh-SYSLOG 3.2 has been released
Over the Christmas break, I had a few hours to spare and tackled a few issues in some of my PowerShell modules. I’ve released Posh-SYSLOG 3.2 as a resolve of this.
This version removes the need to call Get-NetAdapter that's contained in the NetTCPIP module. The reason why I wanted to remove this dependency is to allow Posh-SYSLOG to run on PowerShell 6 (at least on Windows to start with).
Over the Christmas break, I had a few hours to spare and tackled a few issues in some of my PowerShell modules. I’ve released Posh-SYSLOG 3.2 as a resolve of this.
This version removes the need to call Get-NetAdapter that's contained in the NetTCPIP module. The reason why I wanted to remove this dependency is to allow Posh-SYSLOG to run on PowerShell 6 (at least on Windows to start with).
An issue has been reported on GitHub, Ben Claussen has identified an issue with the timestamp for RFC3164 messages. The fix appears to be simple, but I'll want to do some more through testing. I'm hoping to have this fix out in the next week as version 3.2.1.
You can get the updated version from GitHub, or better yet, the PowerShell Gallery.
Kieran Jacobsen
Updated: A Home User Guide to Spectre and Meltdown
Unless you have been living under a rock or in a case, you have probably heard of the CPU vulnerabilities: Meltdown and Spectre. There’s been quite a lot of media hype, you could be forgiven thinking that these are world-ending bugs. My opinion, and that of others is that this isn’t something to panic over.

You might be feeling like Homer Simpson when reading about Meltdown and Spectre.
Updates
2018-01-29
Intel has released updates for variant 2 of the Spectre attack. Several OEMs have started pushing this update out to their customers. There have been widespread reports of device instability. Intel have since recommended that users do not deploy these updates. My recommendation is to hold off on any firmware/BIOS updates for a few more weeks.
Microsoft has also released updates resolving issues with those originally released. The first round of updates resolved issues with AMD systems, the second provides the option to manually disable and enable the Spectre Variant 2 fixes. These updates are not published via Windows Update, you will need to manually install it. If you are experiencing stability issues since these updates have been installed, you may wish to consider installing these updates.
Unless you have been living under a rock or in a case, you have probably heard of the CPU vulnerabilities: Meltdown and Spectre. There’s been quite a lot of media hype, you could be forgiven thinking that these are world-ending bugs. My opinion, and that of others is that this isn’t something to panic over.
Neither Meltdown or Spectre have been used in attacks. While there's proof-of-concept (POC) code that exploits these vulnerabilities, there's no evidence that they've been used in any attacks.
Generally, most guidance has been right, yet I've seen some incorrect or deceptive statements on social media. I wanted to address these in a very quick post, and give some more concrete steps.
I've broken down the response into four main categories, Windows 10, Apple iOS and macOS, Android and finally Web Browsers.
Windows 10
Let’s start with the Windows users. If you're running Windows, you need to ensure that both your anti-virus, computer’s firmware and Windows are all up-to-date to be fully protected.
I'm assuming you're running Windows 10. If you're running any older version of Windows, please update, Windows 10 is the most secure Windows to date. Windows 10, especially the latest Fall Creators update contains a significant amount of new security protection features, all available to you out-of-the-box and configured for you.
Regrettably, due to the Windows ecosystem, ensuring you're safe isn’t as simple for Windows users as Microsoft or those of us in the industry would like.
1 - Update Anti-Virus (AV) Software
During testing, Microsoft found that the fixes might result in a Blue Screen of Death (BSOD) when installed on computers running some anti-virus software. Basically, some AV products hook into Windows in a weird way that conflicts with the patch.
To ensure that you don’t end up with a broken PC, Windows won't install the patch if it thinks there might be an issue. How does Microsoft know? Your AV software needs to create a specific registry key to let Windows know it's ok to install the patch.
For most AV products, they're creating they required key, but there are quite a few that don't. How o you know if your product supports the fixes? Thankfully, Kevin Beaumont has been maintaining an extremely helpful list.
What if you don’t run an AV product? What if you have disabled Windows Defender completely? I haven’t tested to confirm, but you may need to create the registry manually.
Another pitfall is that you need to ensure your license or subscription for your AV product is valid. Often, I see people using the AV that came bumbled with their computer; that’s ok, if you maintain the license. The bundled AV products often come as time limited trials, or only last for a year. Sometimes when they expire, it isn’t obvious, and you're left with no protection at all!
Actions:
- Ensure that you have a license for your AV product. If your license has expired, you can switch back to Windows Defender.
- Ensure that your AV product is up-to-date.
2 - Update Computer Firmware/BIOS
A common misconception is that these issues can be fixed at an Operating System layer. Operating System updates only address Meltdown, to resolve Spectre, we need to install firmware updates on your computer’s hardware.
Your computers Original Equipment Manufacturer (OEM), will need to make updates available to you to ensure that your computer is running the correct processor fixes.
Microsoft and Dell have released updates for their computers, Lenovo appears to be patched but I can’t find anything official. There's no word from HP, and it doesn’t appear that they've released any updates for these vulnerabilities. It's worth noting that Microsoft hasn’t released firmware updates for the original Surface Pro or Surface Pro 2. The smaller vendors weren't included in the pre-announcement work, so they're playing catch-up; for instance, Razer is currently working on update for their Razer Blade line.
Actions:
- Depending upon your computer, the firmware updates may happen automatically, or you may need to manually do them. Check with your OEM.
- Check with your OEM to determine if firmware updates are available.
3 - Update Windows 10
The different versions of Windows 10: Release, Anniversary, Creators and Fall Creators; make it a harder to confirm you have the correct updates installed.
The first thing we need to do is determine what version of Windows 10 your computer is running:
- Open Windows 10 Settings app.
- Select “System”, then “About”.
- Under the heading “Windows Specifications” look at the “Version Field”.
- Make a note of the number. It will typically be 1507, 1511, 1607, 1703 or 1709.

You can see I am running Windows 10 Pro 1709 (Fall Creators Update).
Next, we need to check if the related update is installed.
- Open the Windows 10 Settings app. If you kept it open from the last stage, select “Home”.
- Select “Update & Security”.
- Select “View installed update history”.
- Under “Quality Updates”, look for an update with the appropriate knowledge base (KB number) as listed in the table:

Windows 10 Versions and their Spectre/Meltdown Patches

You can see here that KB 4056892 has been installed on my computer.
Please Note: Right now Microsoft has suspended pushing out the Spectre patch to some systems with AMD processes due to another BSOD issue. I will update this post when more informaiton is available.
Actions:
- Ensure that the January updates for Windows 10 have been installed according to the steps above.
Apple iOS and macOS
All the Apple line-up, except for the Apple Watch, are impacted by Meltdown and Spectre. This includes Apple iPhones and iPads running their A-series processors. Fixes were included in the macOS 10.13.2, iOS 11.2 and tvOS 11.2 updates released in December. These updates include hardware firmware updates and operating system fixes.
Actions:
- Ensure macOS 10.13.2, iOS 11.2 and tvOS 11.2 or greater are installed.
Android
Android has always been slow on the uptake for security updates due to the diversity of devices out there. Updates need to be created by the Android team, and then distributed out via your device’s maker or in some cases, your mobile carrier. The result is often, updates, be they stability, performance or security updates, just don’t reach you the end-user.
Updates have already been made available by the Android team, with Google pushing them out to supported Nexus and Pixel phones. The problem is that there's been little to no word from the other Android phone and tablet makers.
Actions:
- Supported Pixel and Nexus Devices: Ensure you're running the latest update.
- Confirm with your devices maker if updates are available.
Web Browsers
The most likely way that these vulnerabilities will be exploited is via JavaScript, a type of code that webpages can run in your browser. Due to this risk, this Microsoft, Google, Apple and Mozilla have all released update to their browsers with new protection mechanisms.
Actions:
- For Microsoft Edge and Internet Explorer, the protections are included in the patch that we looked at earlier.
- Google will be releasing protections as part of Chrome 64, which is scheduled to be released on January 23rd.
- Apple released updates for Safari on the January 9th. For Windows and macOS, you can install these directly. For iOS devices you'll need to ensure that you install iOS 11.2.2.
- Firefox 57 will include the protections, it's scheduled to be released on January 23rd as well.
- Other browsers like Opera and Brave haven't provided schedules for the updates. As these are based on Chromium, expect updates around January 23rd.
Conclusion
There is no reason to panic over the Meltdown and Spectre CPU vulnerabilities. Ensuring that your computer is updated, from your computers firmware, to operating system, to anti-virus and browser will keep you protected.
Kieran Jacobsen
Posh-SYSLOG version 3.1.1 has been released
Just a quick note to announce that I've released an update for my Posh-SYSLOG module, version 3.1.1
The module fixes issues with PowerShell 4.0 support as reported by Cristiano Guadagnino and Brian Napolitano. As always, a huge round of thanks goes out to the pair for discovering the issue, pointing me in the right direction to fixing the issue and testing the fixes.
Just a quick note to announce that I've released an update for my Posh-SYSLOG module, version 3.1.1.
The module fixes issues with PowerShell 4.0 support as reported by Cristiano Guadagnino (@Cris70) and Brian Napolitano (@bnapolitano). As always, a huge round of thanks goes out to the pair for discovering the issue, pointing me in the right direction to fixing the issue and testing the fixes.
Cristiano created an issue stating that the latest version (3.0.1) didn’t correctly load on PowerShell 4.0. Brian quickly pointed out that some of the changes made for the declaration of the enums was probably the cause of the issue.
I must apologise for the oversight on my part, mea culpa, I haven't been thoroughly testing my modules on older versions of PowerShell. I made two changes to resolve the issue:
- I've switched back to the original enum syntax as it's supported PowerShell 3 through to 6.
- I've removed the OutputType definition, as that appears to cause issues as well, and is a documentation only attribute.
Cristiano also pointed out that a few people use the Releases section of a GitHub project to source the PowerShell modules. I will ensure to keep these updated going forward.
You can get the updated version from GitHub, or better yet, the PowerShell Gallery.
Kieran Jacobsen
Levelling up your PowerShell modules with Plaster
Between personal, community and team projects, I am involved in the maintenance of over 30 PowerShell modules. I have two recommendations to anyone starting with PowerShell, read the community style and formatting guidelines, and most importantly, standardise your work. I have developed a structure for all of my projects over the years, and now that I am performing more mentoring and code reviews I thought I would share some of my tips.
Between personal, community and team projects, I am involved in the maintenance of over 30 PowerShell modules. I have two recommendations to anyone starting with PowerShell, read the community style and formatting guidelines, and most importantly, standardise your work. I have developed a structure for all of my projects over the years, and now that I am performing more mentoring and code reviews I thought I would share some of my tips.
In the past, I would manually create the framework for my new modules. I would create a folder, copy some files from a previous project, rename some things, etc. It was ALL MANUAL! A few weeks, ago I attend the Melbourne PowerShell Meetup where a fellow Cloud and Datacenter MVP, Rob Sewell spoke about how he uses Plaster. Rob did a wonderful job showing how Plaster and Pester can be used to develop PowerShell modules and got me thinking about how I too could make use of Plaster.
I grabbed a copy of Rob’s Plaster template and then set about making it my own and changing it to meet my requirements. Going through the process of making my own template caused me to critically look at some of the decisions I was making when creating new modules and thought that others might benefit from hearing some of my thought process.
Why use Plaster?
The reason you should use Plaster is to save time!
If you have spent much time doing web development, Plaster is a like Yeoman but with a PowerShell focus. With Plaster, I create a template that defines the structure of my modules including what files and folders should be created. The next time I want to create a new module, I use Plaster, specify the template and some parameters and presto! The module has been created just as I like.
Plaster allows us to quickly make modules that follow the same structure and allows us to get on with coding and delivering quality PowerShell code.
Why should you standardize your file and folder layout?
Sticking to some simple rules about where you place your module’s code, including folder structure, will help you as a maintainer and anyone else who might want to contribute.
Each module needs a starting point, and for PowerShell modules, that will be a root folder. This root folder will have the same name as the module and the psd1 and psm1 files.
I create a new Git repository for each module, even if it is for internal projects or I am experimenting with something. This goes for repositories in VSTS and GitHub. The reason for this is that it keeps items like issues, pull requests, build, and release pipelines separate. This might seem like a bit messy, and you might be worried about having many repositories, however the cost of repositories is free or negligible, and with this structure I know that a pull request on my Posh-SYSLOG module will only impact a single module.
Now I don’t place any functions within the psm1 file, instead each function has its own ps1 file. The benefits of maintaining one function per file are:
- Functions are clearly defined and contained,
- It is easier to see read and search through the modules code,
- Adding new functions is easier,
- Removing functions is easier,
- The option to reuse functions is possible (as it is often as simple as copying the file), and
- Reviewing changes to code is easier, especially for GitHub pull requests as a change to a function only impacts a single file.
Obviously, I don’t leave the ps1 files sitting within the root folder. In most of my current modules, you will see that all of the functions are placed in a folder aptly named functions. I am now separating these to:
- Public functions, that is, functions intended for users are placed in
functions; - Internal functions, those that shouldn’t be available to users are placed in
internal.
There is a simple reason to maintain separate folders. It allows for anyone looking at the code to quickly and visually determine which functions will be exposed to an end user of the module. There is no digging around in files to determine which functions should be, and which ones should not be available to the user.
So, what do I put in the psm1 file? For many years, my psm1 file has contained some dynamic loading code from the Chocolatey project. I have recently switched this code for that created by David Christian. The advantage of David’s code is it correctly handles all the file and folder structure and it only exports those functions I intended to make public.
Since PowerShell 5, there has been support for classes in PowerShell. I think it makes sense to place each class within its own folder, and to place them into a folder of their own, classes. Classes should be placed within their own ps1 files bearing the name of the class.
You are writing Pester tests, aren’t you??? I prefer to give a similar treatment to my Pester files, so I put them into a folder called tests.
The last folder I want to discuss is resources. I use this folder to place any additional files, like executables, template files, or other files that my module may need and that need to be maintained in source control.
Helping users with a Readme and Change Log
I must admit, I haven’t done an excellent job maintaining readmes and change logs for my PowerShell modules. Most of my modules don’t have either of these files, so to encourage me to keep and maintain these files, I have created two template files, README.MD and CHANGELOG.MD.
Using the template file functionality in Plaster, the template will create a readme file containing a description of the module, the author (that’s you), information on how to install, update and even remove the module.
If you are hosting your module on GitHub, your README.MD is incredibly important. When you browse to a repository on GitHub, this file will be rendered (from markdown) as the homepage. What I have learnt is that this is one of your big opportunities to sell your code to the world, it isn’t just about talking about how to install and use the code, but also sell you as a professional.
Including a License
One thing that is often overlooked in the PowerShell community is licensing. No, I am not talking about charging money for your modules, I am talking about open source licenses.
Whilst the licensing of a PowerShell module might not seem important for you, I can ensure you that for some, it is extremely critical. In some organisations, developers and administrators may not be able to use an application or library unless they can clearly determine what license is applied to it.
My preference is for the MIT license, firstly, it is really short and easy to understand, others can be extremely long and discourage people from reading and understanding what they are agreeing with. The MIT license contains conditions requiring the preservation of the original copyright and license notices whilst allowing commercial use, modification, distribution, and private use. Importantly, it clearly defines your liability or lack thereof.
The License parameter within the Plaster template controls if the license is included in any new module that you are creating.
A great tool to assist in deciding what License is right for your project is ChooseAlicense.com. It asks you a few questions and will then make recommendations. Github also provide some great guidance on licenses too.
Include customized VS Code settings
After many years of using the PowerShell ISE and ISE Steroids, I have made the switch to using Visual Studio Code as my primary PowerShell IDE. One of the things I love about VS Code is that it is highly customable.
With VS Code we can specify a variety of settings that impact how our PowerShell is formatted, for instance:
- Tabs or spaces?
- Tab size. Do you like 2 spaces or 4?
- Where to place open and close braces? Same line? New line?
- Do we insert of whitespace after operators?
- Etc
Now some of these things are personal preferences, however I want each of the projects I work on to follow the same format, no matter who is working on the code base. After all, maintaining a uniform coding style across a project assists in its maintenance!
You can actually specify VS Code settings at a global and at a project level. By specifying how I want the code to be formatted using the settings.json file located in .vscode within your project’s root folder I can ensure that anyone who works on the code will produce the same code.
I also like to include some common tasks that I often want to run from within VS Code. In my template, I currently only include a task to run Pester tests that has been taken from the template included with Plaster. The tasks.json file defines what shell and what tasks can be executed.
Encouraging the use of Pester
One of the things I have been trying to push more for my personal projects is the creation and maintenance of Pester tests. Testing is crucial for delivering reliable code, and Pester provides us with a foundation to create reusable tests for our code.
Rob’s original template included some Pester scaffolds based upon the work of June Blender. June was a driving force behind PowerShell’s documentation and Sapien’s PowerShell HelpWriter.
These scaffolds separate tests into:
- Unit tests – testing individual functions in isolation.
- Comment based help tests – validating that comment based help has been written.
- Feature Tests – Do the features of the module work as a whole?
- Project tests – Focus on Script Analyzer and that the module loads cleanly.
I have taken these and made some minor modifications. My modifications of Rob and June's templates were just to fix some performance issues I had seen, and to separate the project and help test exceptions into separate files (that are now txt files).
I have included a rough guide on the different files in README_TESTS.md.
Encouraging contributions via GitHub
It is often said that GitHub is the social network for coding. Users can interact with projects, create issues, share knowledge, and contribute to projects together. GitHub isn’t just for hardcore software developers, it is also a place for script developers like PowerShell developers!
It isn’t just open source, Linux types that use GitHub. Microsoft is now one of the biggest organisations on GitHub and one of the biggest contributors. Don’t believe me? PowerShell, Pester, Plaster and even the Azure PowerShell modules can all be found on GitHub. If you haven’t created a GitHub account, now is the time to make a start.
As a developer, putting your code up on GitHub is a great start. It can allow you to participate in the PowerShell community and develop a public profile. If you want others to get involved in your own projects, then you need to take some steps to encourage them.
One step I believe is a fantastic way to encourage participation is to define a code of conduct. Now you often associate these with larger projects, however, I believe they are a positive sign, a sign of a welcoming and inclusive project no matter what size the project is. A code of conduct will define how you will treat people, and how you expect as a project maintainer to be treated. There are several sites that provide resources for developing a code of conduct, I used Contributor Covenant as I liked the style and language it uses.
There are three other files that I recommend that you include, a guide to contributing (contributing.md) and issue and pull request templates (issue_template.md and pull_request_template.md). I based all three of the files contained in my Plaster template on the Atom project, but you can really put whatever you want into them, there really isn’t a set structure.
Issue and pull request templates are a fantastic idea as they allow you, the maintainer, to provide some prompts or hits as to what should be included. For instance, in the issue template I ask about what operating system and PowerShell version a user is running; helping me to reproduce the issues that a user might have.
Not all of my projects are hosted on GitHub, so I used a Plaster parameter, GitHub, to control the creation of these files.
The final layout
The final layout for a project would look something like this when viewed from VS Code:
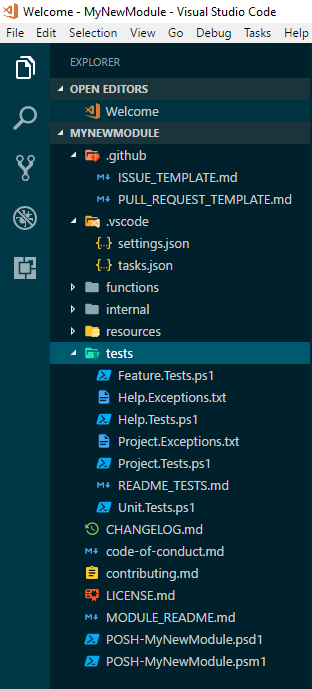
Using this Plaster template
Installing Plaster
You can install Plaster from the PowerShell Gallery
PS> Install-Module -Name PlasterClone the template
You can obtain the template from its GitHub Repository, from the command line you can use the following command to clone it to your local system.
PS> git clone https://github.com/poshsecurity/PlasterTemplateCreating a new module
Now that you have template locally, you can run Invoke-Plaster to create a new module based upon the template.
I typically follow this workflow:
- Create a public (or private) on GitHub
- Clone the repository locally
PS> git clone <Path to repository> Create a hash table containing the required parameters, and then call
Invoke-PlasterPS> $PlasterParameters = @{ TemplatePath = "<path to the Plaster Template above>" DestinationPath = "<path to the new repository you cloned>" AuthorName = "Cool PowerShell Developer" AuthorEmail = "[email protected]" ModuleName = "MyNewModule" ModuleDescription = "This is my awesome PowerShell Module!" ModuleVersion = "0.1" ModuleFolders = @("functions", "internal") GitHub = "Yes" License = "Yes" } PS> Invoke-Plaster @PlasterParameters- Plaster should then execute, creating the required files and folders.
- When you are ready you can push everything up to GitHub.
Congratulations you are ready to start coding!
Wrapping Up
You can get my Plaster Template here.
The benefits of using Plaster and a standardized structure for PowerShell module development are:
- Faster project start-up,
- Clear delineation of internal and public functions,
- Separation of functions, classes, tests, and resources, and,
- Simpler psm1 files.
We have also seen how we can use:
- Files like README.MD and CHANGELOG.MD to create better documentation.
- How to use a license provide users and other developers with guidance on how they can use and extend your code.
- We can customise VS Code on a per folder level, allow for uniform developer experience.
- Through testing with Plaster, using a standardised structure for our tests.
- How we can encourage contributions with a code of conduct, contribution guide and issues and pull request templates.
Big thanks to Rob Sewell for his Plaster template and June Blender for her Pester templates.
Kieran Jacobsen